> ## Documentation Index
> Fetch the complete documentation index at: https://docs.stackone.com/llms.txt
> Use this file to discover all available pages before exploring further.

# Azure Blob Storage OAuth 2.0 (Entra ID) connector profile – StackOne setup guide

> Set up the OAuth 2.0 (Entra ID) connector profile for Azure Blob Storage in StackOne. One-time admin setup required before your users can link Azure Blob Storage accounts via Hub.

<Warning>You need at least the Application Developer role in Microsoft Entra ID to register an application, and a Global Administrator (or Privileged Role Administrator) to grant admin consent for the Azure Storage permission. Assigning the Azure RBAC role on the storage account requires Owner or User Access Administrator on that account.</Warning>

<Panel>
  <div className="not-prose guides-scope-selector" data-guides-scope-selector data-guide-actions-json="[{&#x22;id&#x22;:&#x22;azureblobstorage_upload_blob&#x22;,&#x22;label&#x22;:&#x22;Upload Blob&#x22;,&#x22;scopes&#x22;:[&#x22;https://storage.azure.com/user_impersonation&#x22;]},{&#x22;id&#x22;:&#x22;azureblobstorage_append_block&#x22;,&#x22;label&#x22;:&#x22;Append Block&#x22;,&#x22;scopes&#x22;:[&#x22;https://storage.azure.com/user_impersonation&#x22;]},{&#x22;id&#x22;:&#x22;azureblobstorage_download_blob&#x22;,&#x22;label&#x22;:&#x22;Download Blob&#x22;,&#x22;scopes&#x22;:[&#x22;https://storage.azure.com/user_impersonation&#x22;]},{&#x22;id&#x22;:&#x22;azureblobstorage_get_blob_properties&#x22;,&#x22;label&#x22;:&#x22;Get Blob Properties&#x22;,&#x22;scopes&#x22;:[&#x22;https://storage.azure.com/user_impersonation&#x22;]},{&#x22;id&#x22;:&#x22;azureblobstorage_delete_blob&#x22;,&#x22;label&#x22;:&#x22;Delete Blob&#x22;,&#x22;scopes&#x22;:[&#x22;https://storage.azure.com/user_impersonation&#x22;]},{&#x22;id&#x22;:&#x22;azureblobstorage_copy_blob&#x22;,&#x22;label&#x22;:&#x22;Copy Blob&#x22;,&#x22;scopes&#x22;:[&#x22;https://storage.azure.com/user_impersonation&#x22;]},{&#x22;id&#x22;:&#x22;azureblobstorage_set_blob_tier&#x22;,&#x22;label&#x22;:&#x22;Set Blob Tier&#x22;,&#x22;scopes&#x22;:[&#x22;https://storage.azure.com/user_impersonation&#x22;]},{&#x22;id&#x22;:&#x22;azureblobstorage_create_blob_snapshot&#x22;,&#x22;label&#x22;:&#x22;Create Blob Snapshot&#x22;,&#x22;scopes&#x22;:[&#x22;https://storage.azure.com/user_impersonation&#x22;]},{&#x22;id&#x22;:&#x22;azureblobstorage_undelete_blob&#x22;,&#x22;label&#x22;:&#x22;Undelete Blob&#x22;,&#x22;scopes&#x22;:[&#x22;https://storage.azure.com/user_impersonation&#x22;]},{&#x22;id&#x22;:&#x22;azureblobstorage_set_blob_properties&#x22;,&#x22;label&#x22;:&#x22;Set Blob Properties&#x22;,&#x22;scopes&#x22;:[&#x22;https://storage.azure.com/user_impersonation&#x22;]},{&#x22;id&#x22;:&#x22;azureblobstorage_abort_copy_blob&#x22;,&#x22;label&#x22;:&#x22;Abort Copy Blob&#x22;,&#x22;scopes&#x22;:[&#x22;https://storage.azure.com/user_impersonation&#x22;]},{&#x22;id&#x22;:&#x22;azureblobstorage_get_blob_metadata&#x22;,&#x22;label&#x22;:&#x22;Get Blob Metadata&#x22;,&#x22;scopes&#x22;:[&#x22;https://storage.azure.com/user_impersonation&#x22;]},{&#x22;id&#x22;:&#x22;azureblobstorage_set_blob_metadata&#x22;,&#x22;label&#x22;:&#x22;Set Blob Metadata&#x22;,&#x22;scopes&#x22;:[&#x22;https://storage.azure.com/user_impersonation&#x22;]},{&#x22;id&#x22;:&#x22;azureblobstorage_get_blob_tags&#x22;,&#x22;label&#x22;:&#x22;Get Blob Tags&#x22;,&#x22;scopes&#x22;:[&#x22;https://storage.azure.com/user_impersonation&#x22;]},{&#x22;id&#x22;:&#x22;azureblobstorage_set_blob_tags&#x22;,&#x22;label&#x22;:&#x22;Set Blob Tags&#x22;,&#x22;scopes&#x22;:[&#x22;https://storage.azure.com/user_impersonation&#x22;]},{&#x22;id&#x22;:&#x22;azureblobstorage_find_blobs_by_tags&#x22;,&#x22;label&#x22;:&#x22;Find Blobs By Tags&#x22;,&#x22;scopes&#x22;:[&#x22;https://storage.azure.com/user_impersonation&#x22;]},{&#x22;id&#x22;:&#x22;azureblobstorage_list_containers&#x22;,&#x22;label&#x22;:&#x22;List Containers&#x22;,&#x22;scopes&#x22;:[&#x22;https://storage.azure.com/user_impersonation&#x22;]},{&#x22;id&#x22;:&#x22;azureblobstorage_get_blob_service_properties&#x22;,&#x22;label&#x22;:&#x22;Get Blob Service Properties&#x22;,&#x22;scopes&#x22;:[&#x22;https://storage.azure.com/user_impersonation&#x22;]},{&#x22;id&#x22;:&#x22;azureblobstorage_set_blob_service_properties&#x22;,&#x22;label&#x22;:&#x22;Set Blob Service Properties&#x22;,&#x22;scopes&#x22;:[&#x22;https://storage.azure.com/user_impersonation&#x22;]},{&#x22;id&#x22;:&#x22;azureblobstorage_create_container&#x22;,&#x22;label&#x22;:&#x22;Create Container&#x22;,&#x22;scopes&#x22;:[&#x22;https://storage.azure.com/user_impersonation&#x22;]},{&#x22;id&#x22;:&#x22;azureblobstorage_get_container_properties&#x22;,&#x22;label&#x22;:&#x22;Get Container Properties&#x22;,&#x22;scopes&#x22;:[&#x22;https://storage.azure.com/user_impersonation&#x22;]},{&#x22;id&#x22;:&#x22;azureblobstorage_get_container_metadata&#x22;,&#x22;label&#x22;:&#x22;Get Container Metadata&#x22;,&#x22;scopes&#x22;:[&#x22;https://storage.azure.com/user_impersonation&#x22;]},{&#x22;id&#x22;:&#x22;azureblobstorage_set_container_metadata&#x22;,&#x22;label&#x22;:&#x22;Set Container Metadata&#x22;,&#x22;scopes&#x22;:[&#x22;https://storage.azure.com/user_impersonation&#x22;]},{&#x22;id&#x22;:&#x22;azureblobstorage_delete_container&#x22;,&#x22;label&#x22;:&#x22;Delete Container&#x22;,&#x22;scopes&#x22;:[&#x22;https://storage.azure.com/user_impersonation&#x22;]},{&#x22;id&#x22;:&#x22;azureblobstorage_get_container_acl&#x22;,&#x22;label&#x22;:&#x22;Get Container ACL&#x22;,&#x22;scopes&#x22;:[&#x22;https://storage.azure.com/user_impersonation&#x22;]},{&#x22;id&#x22;:&#x22;azureblobstorage_set_container_acl&#x22;,&#x22;label&#x22;:&#x22;Set Container ACL&#x22;,&#x22;scopes&#x22;:[&#x22;https://storage.azure.com/user_impersonation&#x22;]},{&#x22;id&#x22;:&#x22;azureblobstorage_list_blobs&#x22;,&#x22;label&#x22;:&#x22;List Blobs&#x22;,&#x22;scopes&#x22;:[&#x22;https://storage.azure.com/user_impersonation&#x22;]}]" style={{ borderRadius: '8px', padding: '16px', marginBottom: '24px' }}>
    <div className="guides-scope-selector__title" style={{ fontSize: '16px', fontWeight: '600', marginBottom: '12px' }}>Select Actions to adjust the guide</div>
    <div className="guides-scope-selector__muted" style={{ fontSize: '13px', marginBottom: '12px' }}>Some actions may require additional configuration in the provider to be accessible. Choose the actions you need and the guide will be updated.</div>

    <div style={{ display: 'flex', gap: '8px', marginBottom: '12px', flexWrap: 'wrap' }}>
      <input type="text" placeholder="Search actions..." className="guides-scope-selector__input" data-guide-action-search style={{ padding: '8px 12px', borderRadius: '6px', fontSize: '13px', flex: 1, minWidth: '160px' }} />

      <button type="button" className="guides-scope-selector__quick-btn" data-guide-select-all style={{ padding: '6px 10px', borderRadius: '6px', fontSize: '12px', cursor: 'pointer' }}>Select all</button>
      <button type="button" className="guides-scope-selector__quick-btn" data-guide-clear style={{ padding: '6px 10px', borderRadius: '6px', fontSize: '12px', cursor: 'pointer' }}>Clear</button>
    </div>

    <div className="guides-scope-selector__list" style={{ maxHeight: '240px', overflowY: 'auto', borderRadius: '6px', marginBottom: '12px' }}>
      <div className="guides-scope-selector__list-header" style={{ display: 'flex', alignItems: 'center', gap: '10px', padding: '8px 12px', fontSize: '12px', fontWeight: '600', position: 'sticky', top: 0, zIndex: 1 }}>
        <div style={{ width: '16px', flexShrink: 0 }} />

        <div style={{ flex: 1, textAlign: 'left' }}>Action</div>
        <div style={{ minWidth: '120px', marginLeft: 'auto', textAlign: 'right' }}>Scope(s)</div>
      </div>

      <div className="guides-scope-selector__muted" data-guide-loading style={{ padding: '16px', textAlign: 'center', fontSize: '13px' }}>Loading actions...</div>
      <div className="guides-scope-selector__muted" data-guide-no-results hidden style={{ padding: '16px', textAlign: 'center', fontSize: '13px' }}>No actions match your search.</div>
    </div>

    <div className="guides-scope-selector__url-section" style={{ marginTop: '12px', paddingTop: '12px' }}>
      <div className="guides-scope-selector__muted" style={{ fontSize: '12px', fontWeight: '500', marginBottom: '6px' }}>Dynamic Guide URL</div>

      <div style={{ display: 'flex', alignItems: 'center', gap: '8px', flexWrap: 'wrap' }}>
        <input type="text" readOnly className="guides-scope-selector__input" data-guide-url style={{ flex: 1, minWidth: '200px', padding: '8px 10px', borderRadius: '6px', fontSize: '12px', fontFamily: 'monospace' }} />

        <button type="button" className="guides-scope-selector__copy-btn" data-guide-copy-url style={{ width: '120px', padding: '8px 14px', borderRadius: '6px', fontSize: '13px', fontWeight: '500', cursor: 'pointer', whiteSpace: 'nowrap', marginLeft: 'auto' }}>Copy URL</button>
      </div>

      <div style={{ marginTop: '12px' }}>
        <div className="guides-scope-selector__muted" style={{ fontSize: '12px', fontWeight: '500', marginBottom: '6px' }}>Scopes Selected</div>

        <div style={{ display: 'flex', alignItems: 'stretch', gap: '8px', flexWrap: 'wrap' }}>
          <pre className="guides-scope-selector__input" role="textbox" aria-readonly="true" tabIndex={0} data-guide-scopes-output style={{ flex: 1, minWidth: '200px', minHeight: '88px', maxHeight: '120px', overflowY: 'auto', margin: 0, padding: '8px 10px', borderRadius: '6px', fontSize: '12px', fontFamily: 'monospace', whiteSpace: 'pre-wrap' }} />

          <div className="guides-scope-selector__muted" style={{ display: 'flex', flexDirection: 'column', gap: '8px', fontSize: '12px', fontWeight: '500', flexShrink: 0, alignItems: 'flex-start' }}>
            <div style={{ whiteSpace: 'nowrap' }}>Separator</div>

            <select className="guides-scope-selector__input" data-guide-scope-delimiter style={{ width: '100%', padding: '6px 10px', borderRadius: '6px', fontSize: '12px' }}>
              <option value="space">Space</option>
              <option value="comma">Comma</option>
              <option value="semicolon">Semicolon</option>
              <option value="pipe">Pipe</option>
              <option value="newline">Newline</option>
            </select>

            <button type="button" className="guides-scope-selector__copy-btn" data-guide-copy-scopes style={{ width: '120px', padding: '8px 14px', borderRadius: '6px', fontSize: '13px', fontWeight: '500', cursor: 'pointer', whiteSpace: 'nowrap' }}>Copy scopes</button>
          </div>
        </div>
      </div>
    </div>
  </div>
</Panel>

<section data-guide-section data-guide-scopes="">
  <h2>Register an application in Microsoft Entra ID</h2>

  <p>Create an app registration in the <a href="https://entra.microsoft.com" target="_blank" rel="noopener noreferrer">Microsoft Entra admin center</a> to obtain the OAuth 2.0 credentials StackOne uses to connect Azure Blob Storage.</p>

  <Steps>
    <Step title="Sign in to the Microsoft Entra admin center">
      <div data-guide-step data-guide-scopes="" data-guide-display-scopes-list="">
        <p>Sign in to the <a href="https://entra.microsoft.com" target="_blank" rel="noopener noreferrer">Microsoft Entra admin center</a> with an account that has at least the <strong>Application Developer</strong> role.</p>

        <ul>
          <li>If you manage more than one tenant, confirm you are in the correct directory using the <strong>Settings</strong> (gear) icon before continuing.</li>
        </ul>
      </div>
    </Step>

    <Step title="Create a new app registration">
      <div data-guide-step data-guide-scopes="" data-guide-display-scopes-list="">
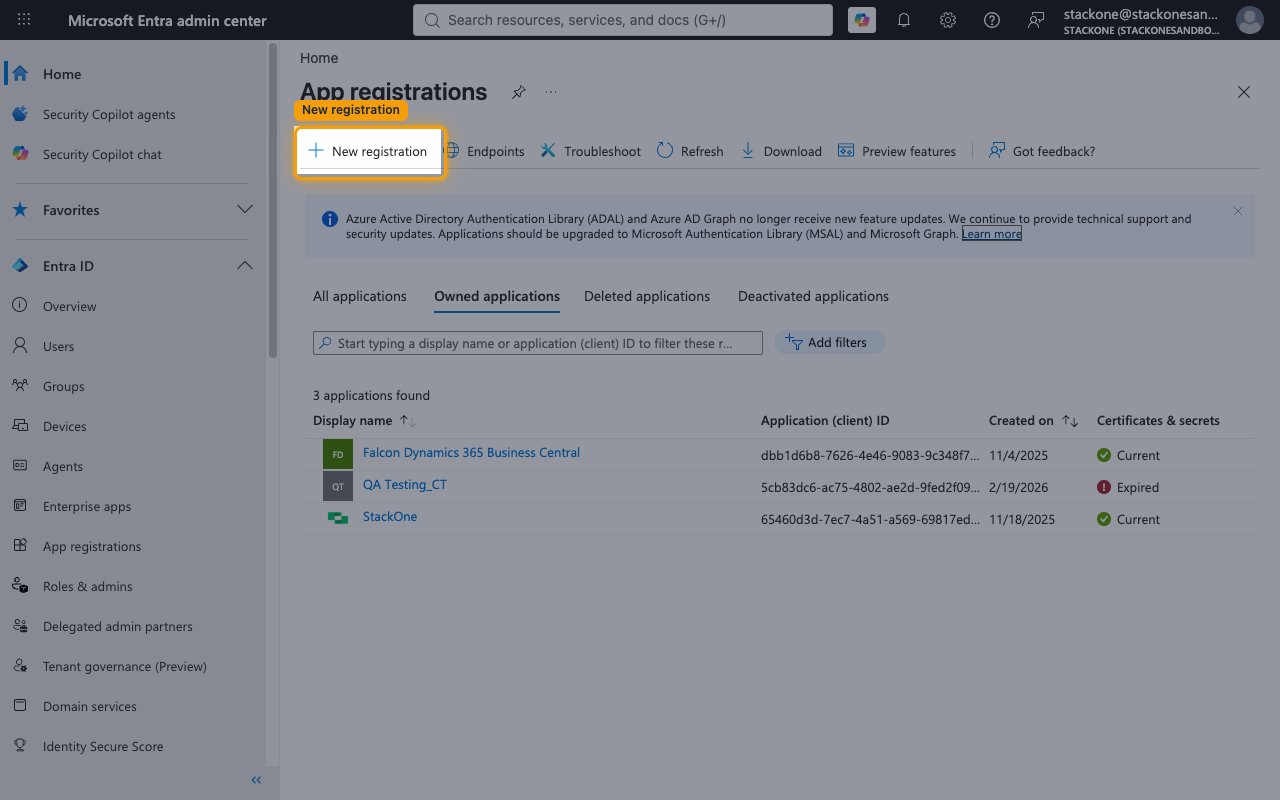
        <p>In the left sidebar, go to <strong>Entra ID</strong> > <strong>App registrations</strong>. On the <strong>App registrations</strong> page, click <strong>New registration</strong> and complete the <strong>Register an application</strong> form.</p>

        <ul>
          <li><strong>Name</strong>: enter a name you will recognise, for example `StackOne Azure Blob Storage`.</li>
          <li>Under <strong>Supported account types</strong>, select the single-tenant option — shown as <strong>Single tenant only</strong> in the current portal, or <strong>Accounts in this organizational directory only (single tenant)</strong> in the classic form.</li>
          <li>Leave <strong>Redirect URI (optional)</strong> empty for now — you will add it in the next section.</li>
          <li>Click <strong>Register</strong>.</li>
        </ul>

        <img src="https://mintcdn.com/stackone-60/8Et9wQ4fF8r7yY8U/connectors/azureblobstorage/images/oauth2-setup-new-registration.png?fit=max&auto=format&n=8Et9wQ4fF8r7yY8U&q=85&s=57ac8d0d92a151542975b561dff72d6d" alt="The App registrations page with the New registration button highlighted" width="1280" height="800" data-path="connectors/azureblobstorage/images/oauth2-setup-new-registration.png" />
      </div>
    </Step>

    <Step title="Copy the Application (client) ID and Directory (tenant) ID">
      <div data-guide-step data-guide-scopes="" data-guide-display-scopes-list="">
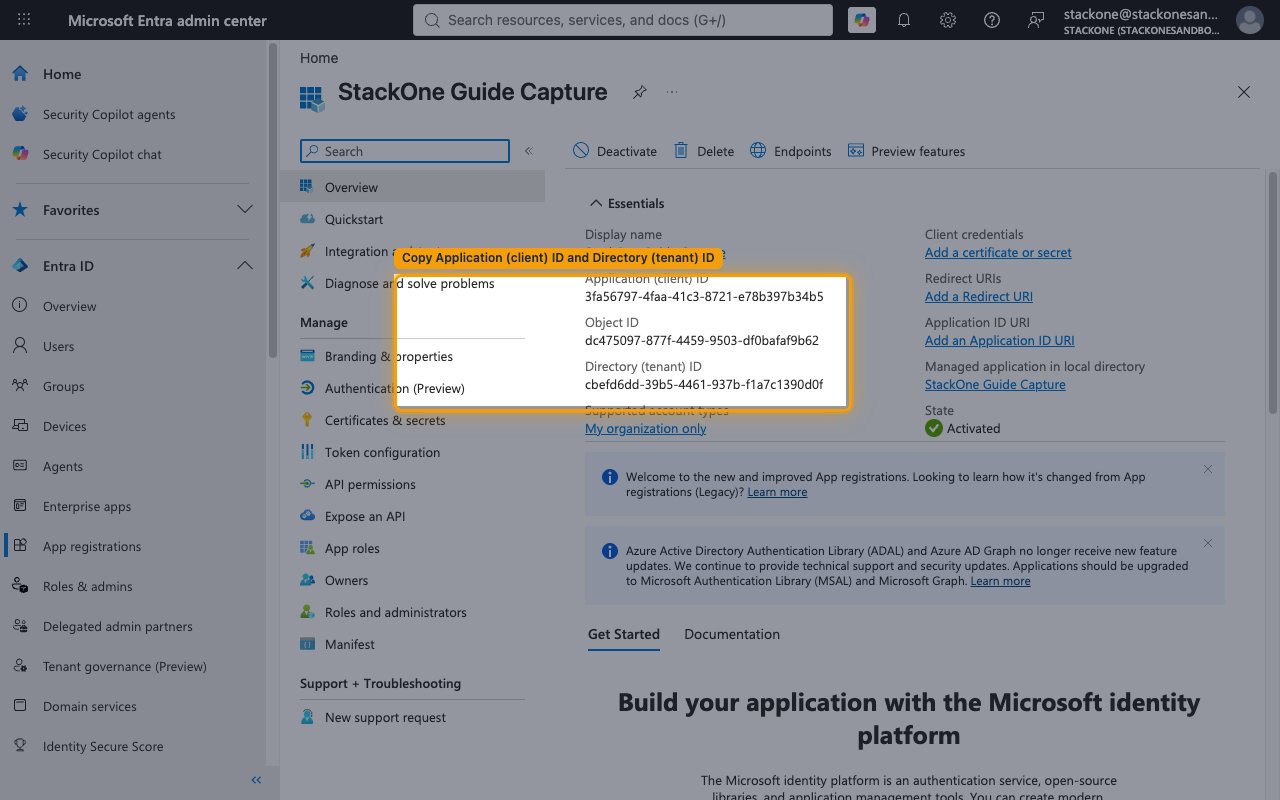
        <p>After registration you land on the app's <strong>Overview</strong> page. From the <strong>Essentials</strong> panel, copy these two values and store them securely:</p>

        <ul>
          <li><strong>Application (client) ID</strong> — the public identifier of your app. Paste it into the <strong>Client ID</strong> field in the StackOne Connector profile.</li>
          <li><strong>Directory (tenant) ID</strong> — your Microsoft Entra tenant identifier. Paste it into the <strong>Tenant ID</strong> field in the StackOne Connector profile.</li>
        </ul>

        <img src="https://mintcdn.com/stackone-60/8Et9wQ4fF8r7yY8U/connectors/azureblobstorage/images/oauth2-setup-overview-ids.png?fit=max&auto=format&n=8Et9wQ4fF8r7yY8U&q=85&s=7a3cf74a03063179f8b76be56620df40" alt="The app Overview page showing the Application (client) ID and Directory (tenant) ID" width="1280" height="800" data-path="connectors/azureblobstorage/images/oauth2-setup-overview-ids.png" />
      </div>
    </Step>
  </Steps>
</section>

<section data-guide-section data-guide-scopes="">
  <h2>Configure the redirect URI</h2>

  <p>Register StackOne's OAuth 2.0 callback URL so Microsoft Entra can return the authorization code to StackOne.</p>

  <Steps>
    <Step title="Add the redirect URI">
      <div data-guide-step data-guide-scopes="" data-guide-display-scopes-list="">
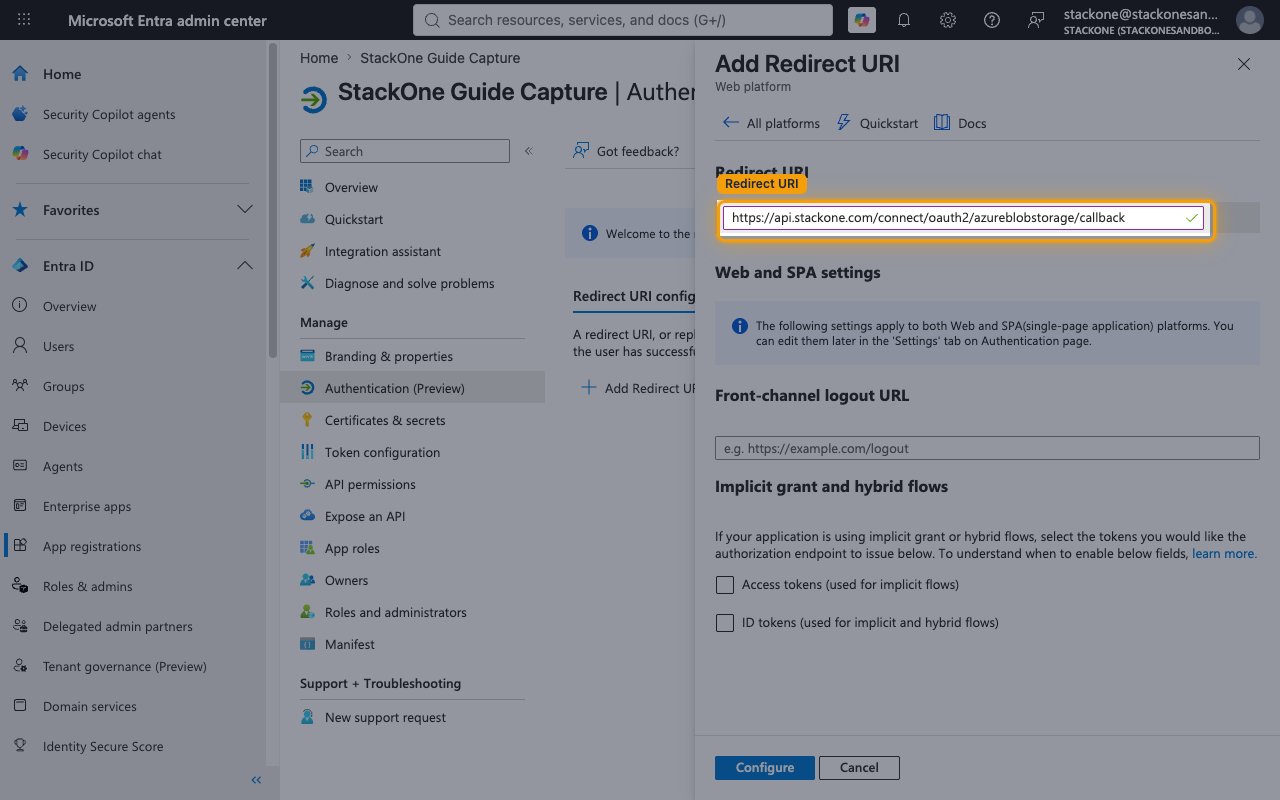
        <p>In the app's left menu, open <strong>Authentication (Preview)</strong>. On the <strong>Redirect URI configuration</strong> tab, click <strong>Add Redirect URI</strong>, then under <strong>Web applications</strong> choose <strong>Web</strong>.</p>

        <ul>
          <li>In the <strong>Redirect URI</strong> field, enter StackOne's callback URL exactly: `https://api.stackone.com/connect/oauth2/azureblobstorage/callback`</li>
          <li>Click <strong>Configure</strong> to save.</li>
          <li>If your portal shows the older <strong>Authentication</strong> page instead of the Preview experience, under <strong>Platform configurations</strong> click <strong>Add a platform</strong>, select <strong>Web</strong>, enter the same URL, and click <strong>Configure</strong>.</li>
        </ul>

        <img src="https://mintcdn.com/stackone-60/8Et9wQ4fF8r7yY8U/connectors/azureblobstorage/images/oauth2-setup-redirect-uri.png?fit=max&auto=format&n=8Et9wQ4fF8r7yY8U&q=85&s=859e28a7ec1adc6a7ec2ee2ee09cbe7d" alt="The Add Redirect URI panel with the Web platform and the StackOne callback URL entered" width="1280" height="800" data-path="connectors/azureblobstorage/images/oauth2-setup-redirect-uri.png" />
      </div>
    </Step>
  </Steps>
</section>

<section data-guide-section data-guide-scopes="">
  <h2>Configure API permissions</h2>

  <p>Grant the app delegated access to Azure Storage and have an administrator consent to it.</p>

  <Steps>
    <Step title="Add the Azure Storage permission">
      <div data-guide-step data-guide-scopes="https://storage.azure.com/user_impersonation,offline_access" data-guide-display-scopes-list="https://storage.azure.com/user_impersonation,offline_access">
        <div className="connector-guide-actions-badge" data-guide-actions-badge data-guide-actions-badge-scopes="https://storage.azure.com/user_impersonation,offline_access" style={{ display: 'block', width: 'fit-content', maxWidth: '100%', padding: '2px 8px', borderRadius: '8px', fontSize: '12px', marginBottom: '8px', marginTop: '-10px', whiteSpace: 'nowrap', overflowX: 'auto', overflowY: 'hidden', msOverflowStyle: 'none', scrollbarWidth: 'none' }}>
          <span>Enables actions: </span><span data-guide-actions-badge-labels>Abort Copy Blob, Append Block, Copy Blob, Create Blob Snapshot, Create Container, Delete Blob, Delete Container, Download Blob, Find Blobs By Tags, Get Blob Metadata, Get Blob Properties, Get Blob Service Properties, Get Blob Tags, Get Container ACL, Get Container Metadata, Get Container Properties, List Blobs, List Containers, Set Blob Metadata, Set Blob Properties, Set Blob Service Properties, Set Blob Tags, Set Blob Tier, Set Container ACL, Set Container Metadata, Undelete Blob, Upload Blob</span>
        </div>

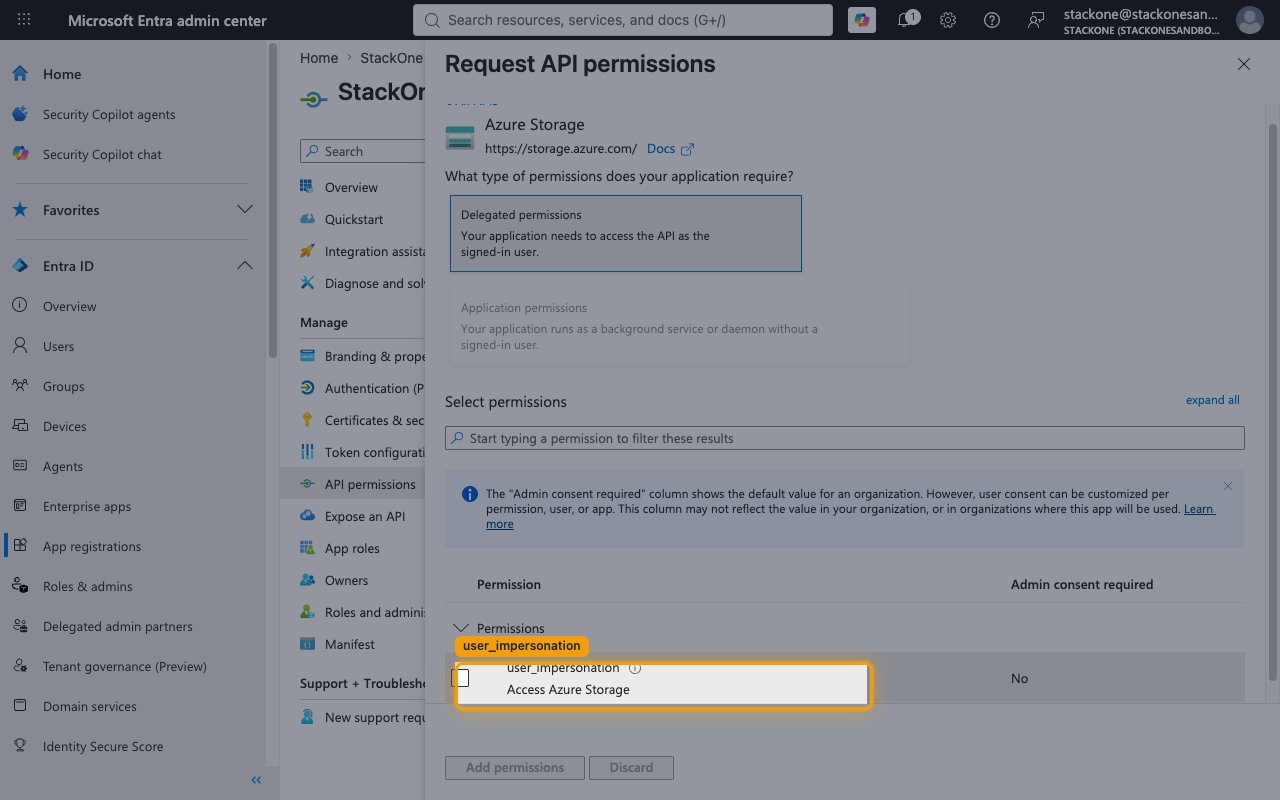
        <p>In the app's left menu, open <strong>API permissions</strong>, click <strong>Add a permission</strong>, then select <strong>Azure Storage</strong>.</p>

        <ul>
          <li>Choose <strong>Delegated permissions</strong>.</li>
          <li>Select <strong>user\_impersonation</strong> (<strong>Access Azure Storage</strong>).</li>
          <li>Click <strong>Add permissions</strong>.</li>
          <li>You do not need to add <strong>offline\_access</strong> here — StackOne requests it automatically during sign-in to obtain refresh tokens, and it requires no Entra ID configuration.</li>
        </ul>

        <img src="https://mintcdn.com/stackone-60/8Et9wQ4fF8r7yY8U/connectors/azureblobstorage/images/oauth2-setup-api-permissions.png?fit=max&auto=format&n=8Et9wQ4fF8r7yY8U&q=85&s=724cec4a171f7d3e2febc0149b981326" alt="The Request API permissions panel with Delegated permissions and user_impersonation selected" width="1280" height="800" data-path="connectors/azureblobstorage/images/oauth2-setup-api-permissions.png" />

        <div style={{ marginTop: '8px' }} data-guide-display-scopes>
          <div className="connector-guide-scopes-container">
            <ul className="not-prose" style={{ listStyleType: "'- '", paddingLeft: '1em', margin: 0 }}>
              <li style={{ overflowWrap: 'anywhere', wordBreak: 'break-word' }} data-guide-display-scope="https://storage.azure.com/user_impersonation">
                <button type="button" className="connector-guide-scope-copy" aria-label="Copy https://storage.azure.com/user_impersonation" title="Copy scope" data-copy="https://storage.azure.com/user_impersonation">
                  <span className="connector-guide-scope-copy__label">[https://storage.azure.com/user\_impersonation](https://storage.azure.com/user_impersonation)</span>
                  <span className="connector-guide-scope-copy__icon" aria-hidden="true">⧉</span>
                </button>
              </li>

              <li style={{ overflowWrap: 'anywhere', wordBreak: 'break-word' }} data-guide-display-scope="offline_access">
                <button type="button" className="connector-guide-scope-copy" aria-label="Copy offline_access" title="Copy scope" data-copy="offline_access">
                  <span className="connector-guide-scope-copy__label">offline\_access</span>
                  <span className="connector-guide-scope-copy__icon" aria-hidden="true">⧉</span>
                </button>
              </li>
            </ul>
          </div>
        </div>
      </div>
    </Step>

    <Step title="Grant admin consent">
      <div data-guide-step data-guide-scopes="" data-guide-display-scopes-list="">
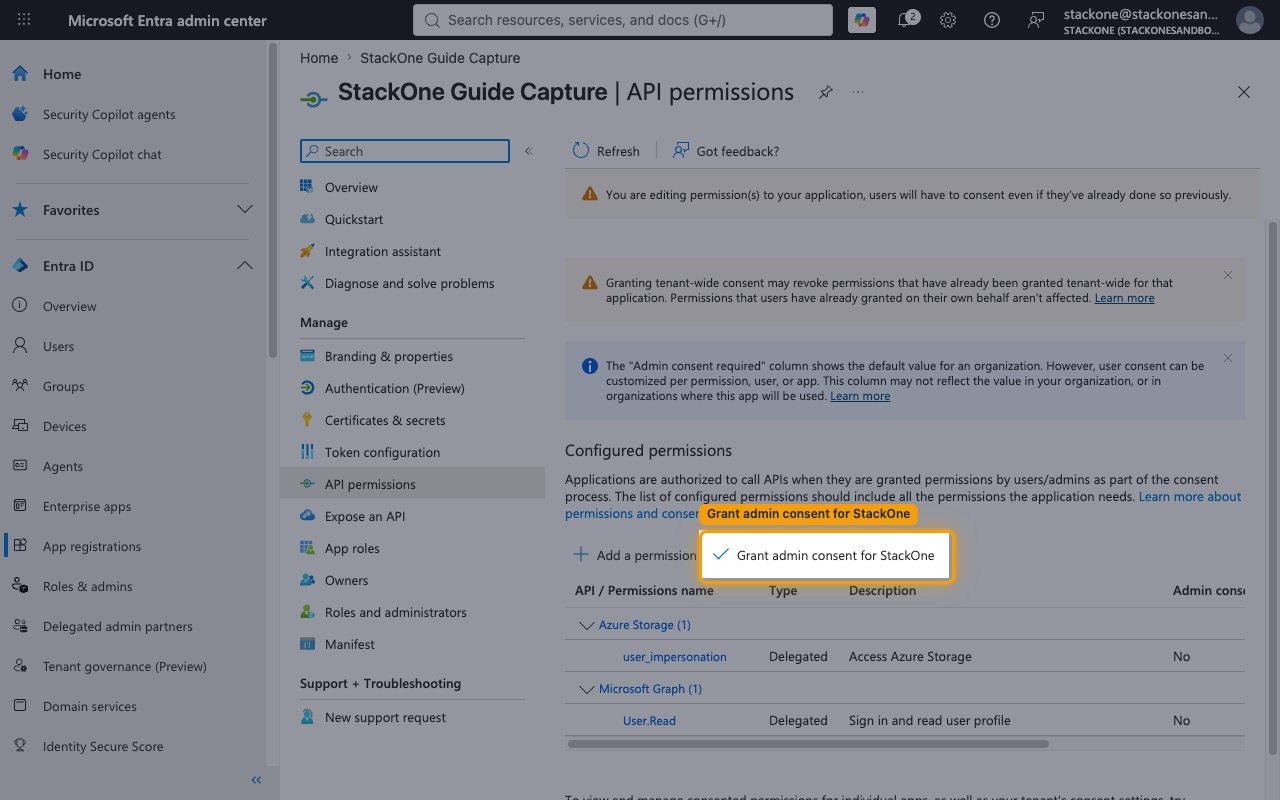
        <p>Back on the <strong>API permissions</strong> page, click <strong>Grant admin consent for \[your tenant]</strong> and confirm with <strong>Yes</strong>. The <strong>user\_impersonation</strong> permission should then show a green <strong>Granted</strong> status.</p>

        <ul>
          <li>Admin consent must be granted by a <strong>Global Administrator</strong> or <strong>Privileged Role Administrator</strong>.</li>
        </ul>

        <img src="https://mintcdn.com/stackone-60/8Et9wQ4fF8r7yY8U/connectors/azureblobstorage/images/oauth2-setup-grant-consent.png?fit=max&auto=format&n=8Et9wQ4fF8r7yY8U&q=85&s=dfc6b680cda0c4de8626f7e71c8092c5" alt="The Configured permissions table with the Grant admin consent button highlighted" width="1280" height="800" data-path="connectors/azureblobstorage/images/oauth2-setup-grant-consent.png" />
      </div>
    </Step>
  </Steps>
</section>

<section data-guide-section data-guide-scopes="">
  <h2>Create a client secret</h2>

  <p>Generate the secret StackOne uses together with the Client ID to authenticate the app registration.</p>

  <Steps>
    <Step title="Generate the secret">
      <div data-guide-step data-guide-scopes="" data-guide-display-scopes-list="">
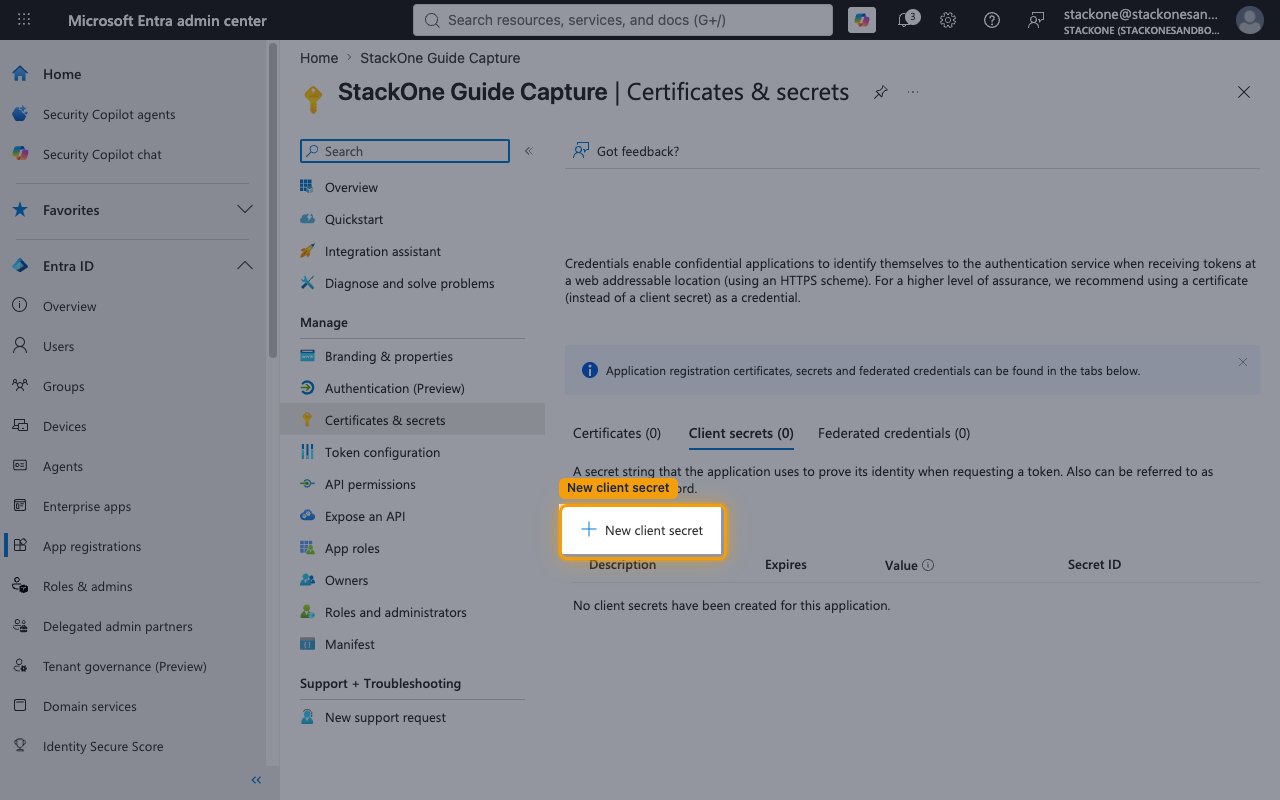
        <p>In the app's left menu, open <strong>Certificates & secrets</strong>, stay on the <strong>Client secrets</strong> tab, and click <strong>New client secret</strong>.</p>

        <ul>
          <li>Enter a <strong>Description</strong>, for example `StackOne Integration`.</li>
          <li>Choose an expiry under <strong>Expires</strong> (for example the recommended 180 days).</li>
          <li>Click <strong>Add</strong>.</li>
        </ul>

        <img src="https://mintcdn.com/stackone-60/8Et9wQ4fF8r7yY8U/connectors/azureblobstorage/images/oauth2-setup-new-secret.png?fit=max&auto=format&n=8Et9wQ4fF8r7yY8U&q=85&s=b0528961d70fd844c840826baa785663" alt="The Certificates & secrets page with the New client secret button highlighted" width="1280" height="800" data-path="connectors/azureblobstorage/images/oauth2-setup-new-secret.png" />
      </div>
    </Step>

    <Step title="Copy the secret value">
      <div data-guide-step data-guide-scopes="" data-guide-display-scopes-list="">
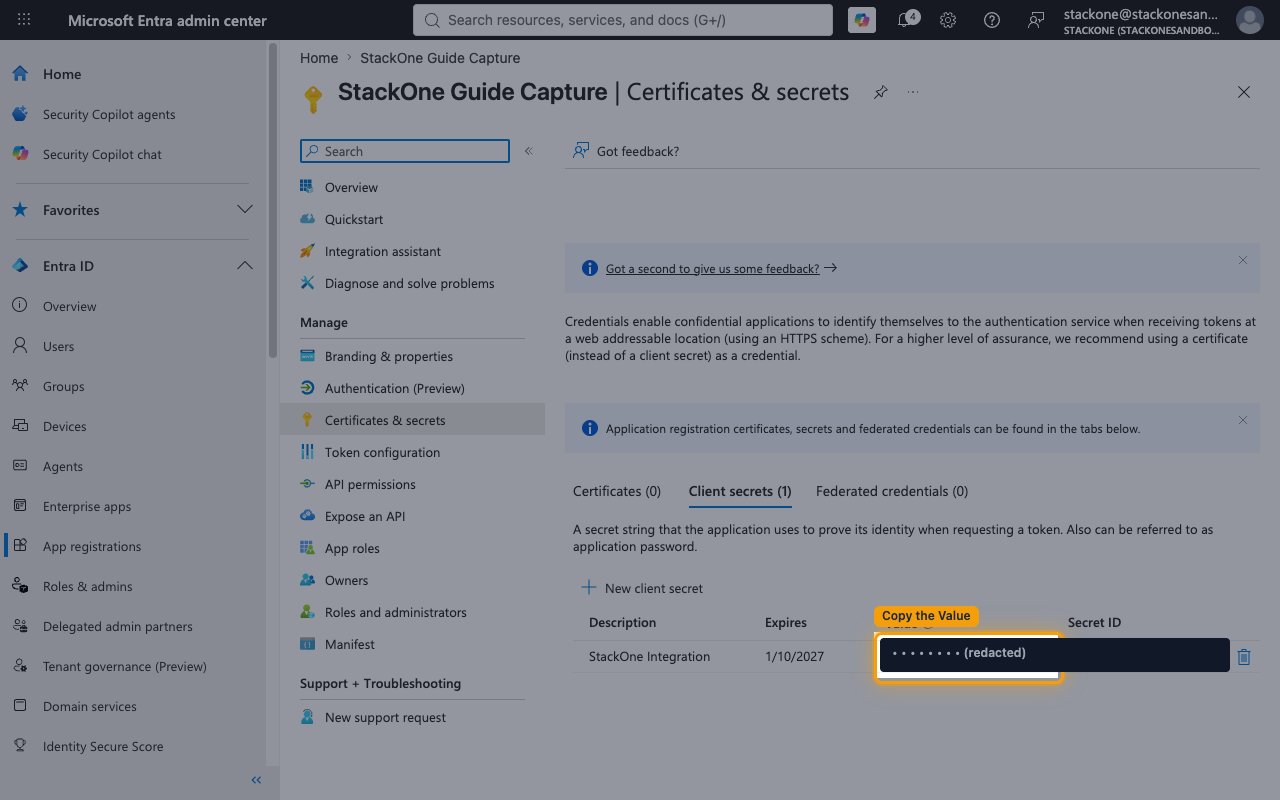
        <p>Copy the secret's <strong>Value</strong> immediately and paste it into the <strong>Client Secret</strong> field in the StackOne Connector profile.</p>

        <ul>
          <li>The <strong>Value</strong> is shown only once and cannot be retrieved after you leave this page — copy it now. Do not copy the <strong>Secret ID</strong>, which is a different value.</li>
          <li>The <strong>Scopes</strong> field in the StackOne Connector profile is optional. Leave it empty to use the defaults (`https://storage.azure.com/user_impersonation` and `offline_access`); only set it if you need to request different scopes.</li>
        </ul>

        <img src="https://mintcdn.com/stackone-60/8Et9wQ4fF8r7yY8U/connectors/azureblobstorage/images/oauth2-setup-secret-value.png?fit=max&auto=format&n=8Et9wQ4fF8r7yY8U&q=85&s=df15562fe42ecfb809cffc98d0743d26" alt="The client secret Value column shown once after the secret is created" width="1280" height="800" data-path="connectors/azureblobstorage/images/oauth2-setup-secret-value.png" />
      </div>
    </Step>
  </Steps>
</section>

<section data-guide-section data-guide-scopes="">
  <h2>Assign an Azure RBAC role on the storage account</h2>

  <p>Microsoft Entra authenticates the user, but Azure Storage authorizes each operation through an Azure RBAC role assigned on the storage account. Assign the role to the user who will authorize the StackOne connection in the <a href="https://portal.azure.com" target="_blank" rel="noopener noreferrer">Azure portal</a>.</p>

  <Steps>
    <Step title="Assign Storage Blob Data Contributor">
      <div data-guide-step data-guide-scopes="" data-guide-display-scopes-list="">
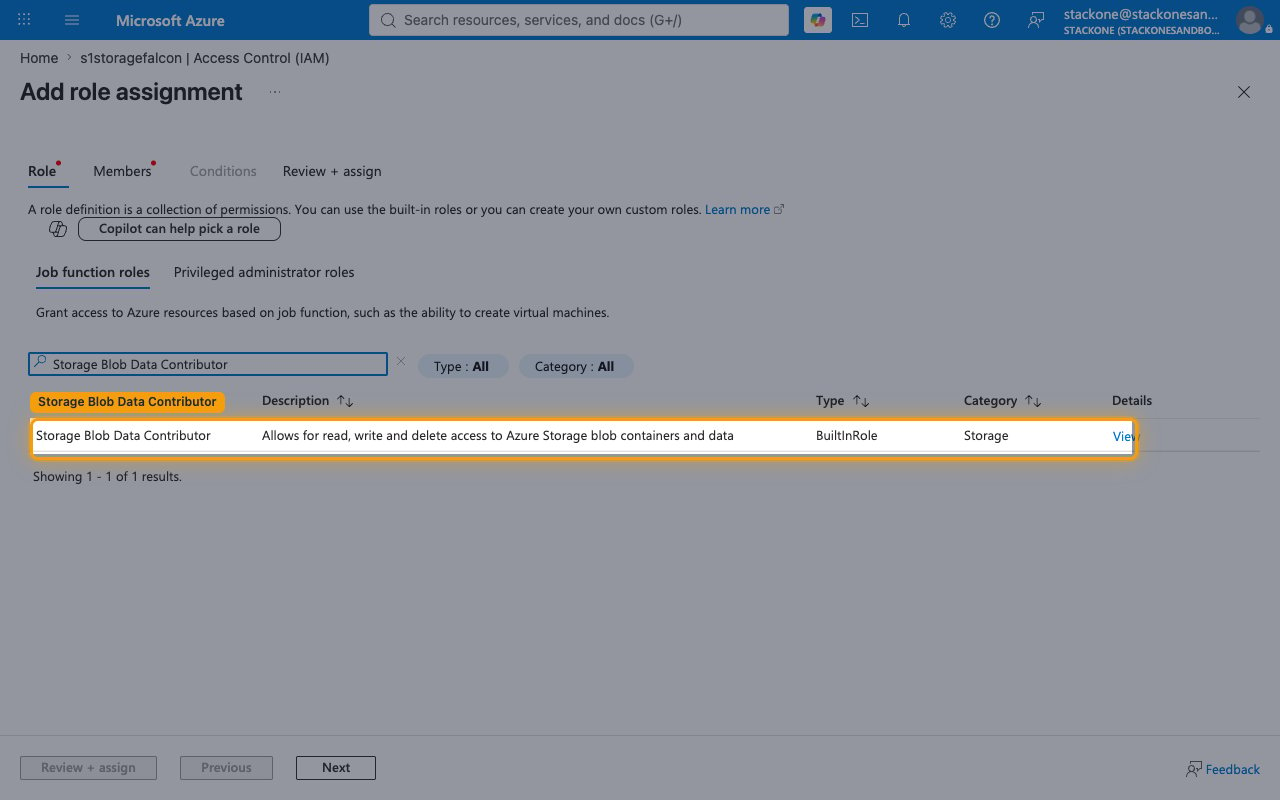
        <p>In the <a href="https://portal.azure.com" target="_blank" rel="noopener noreferrer">Azure portal</a>, search for <strong>Storage accounts</strong> in the top search bar and select the storage account you want to connect. Then select <strong>Access Control (IAM)</strong> in the left sidebar and click <strong>Add</strong> > <strong>Add role assignment</strong>.</p>

        <ul>
          <li>On the <strong>Role</strong> tab, under <strong>Job function roles</strong>, search for and select <strong>Storage Blob Data Contributor</strong> — it grants read, write, and delete access to blobs and containers, which covers most StackOne actions. Then click <strong>Next</strong>.</li>
          <li>On the <strong>Members</strong> tab, keep <strong>Assign access to</strong> set to <strong>User, group, or service principal</strong>, click <strong>Select members</strong>, and choose the user who will connect StackOne.</li>
          <li>Click <strong>Review + assign</strong> to finish.</li>
          <li>If StackOne will use blob tag actions (<strong>Get Blob Tags</strong>, <strong>Set Blob Tags</strong>, <strong>Find Blobs By Tags</strong>), assign <strong>Storage Blob Data Owner</strong> instead — it is a superset of Storage Blob Data Contributor.</li>
        </ul>

        <img src="https://mintcdn.com/stackone-60/8Et9wQ4fF8r7yY8U/connectors/azureblobstorage/images/oauth2-setup-role-assignment.png?fit=max&auto=format&n=8Et9wQ4fF8r7yY8U&q=85&s=f9be7673575b761097af90564a5b649c" alt="The Add role assignment blade with the Storage Blob Data Contributor role selected" width="1280" height="800" data-path="connectors/azureblobstorage/images/oauth2-setup-role-assignment.png" />
      </div>
    </Step>
  </Steps>
</section>

## Creating the StackOne Connector Profile

To create the Connector Profile in StackOne for <strong>Azure Blob Storage</strong>:

<Steps>
  <Step title="Navigate to Connector Profiles">
    Login to StackOne and navigate to [Connector Profiles](https://app.stackone.com/connector_profiles)
  </Step>

  <Step title="Create New Connector Profile">
    <ul>
      <li>Click <strong>+ Connector Profile</strong></li>
      <li>Search for and select <strong>Azure Blob Storage</strong></li>
      <li>Select <strong>Type</strong> as <strong>OAuth 2.0 (Entra ID)</strong></li>

      <li>
        Fill out the fields using details retrieved from your provider:

        <ul style={{ marginLeft: '20px' }}>
          <li><strong>Tenant ID</strong></li>
          <li><strong>Client ID</strong></li>
          <li><strong>Client Secret</strong></li>
          <li><strong>Scopes</strong> (Optional)</li>
        </ul>
      </li>

      <li>(Optional) Select <strong>Actions</strong> to be enabled for this Connector Profile</li>
      <li>Click <strong>Create profile</strong></li>
    </ul>
  </Step>
</Steps>

Congratulations! The new Connector Profile will now show up in your project ready to be used. You can now continue to <a href="/connect/managing-connectors/linking-accounts">Link Accounts</a> for <strong>Azure Blob Storage</strong>.