> ## Documentation Index
> Fetch the complete documentation index at: https://docs.stackone.com/llms.txt
> Use this file to discover all available pages before exploring further.

# Bitly OAuth 2.0 connector profile – StackOne setup guide

> Set up the OAuth 2.0 connector profile for Bitly in StackOne. One-time admin setup required before your users can link Bitly accounts via Hub.

<Warning>You must have a Bitly account to register an OAuth application. Contact Bitly support to request OAuth app registration access if the option is not visible.</Warning>

<section data-guide-section data-guide-scopes="">
  <h2>Registering an OAuth Application</h2>

  <p>To enable OAuth 2.0 for multi-user Bitly connections, you need to register an OAuth application to obtain a Client ID and Client Secret.</p>

  <Steps>
    <Step title="Open Registered OAuth applications">
      <div data-guide-step data-guide-scopes="" data-guide-display-scopes-list="">
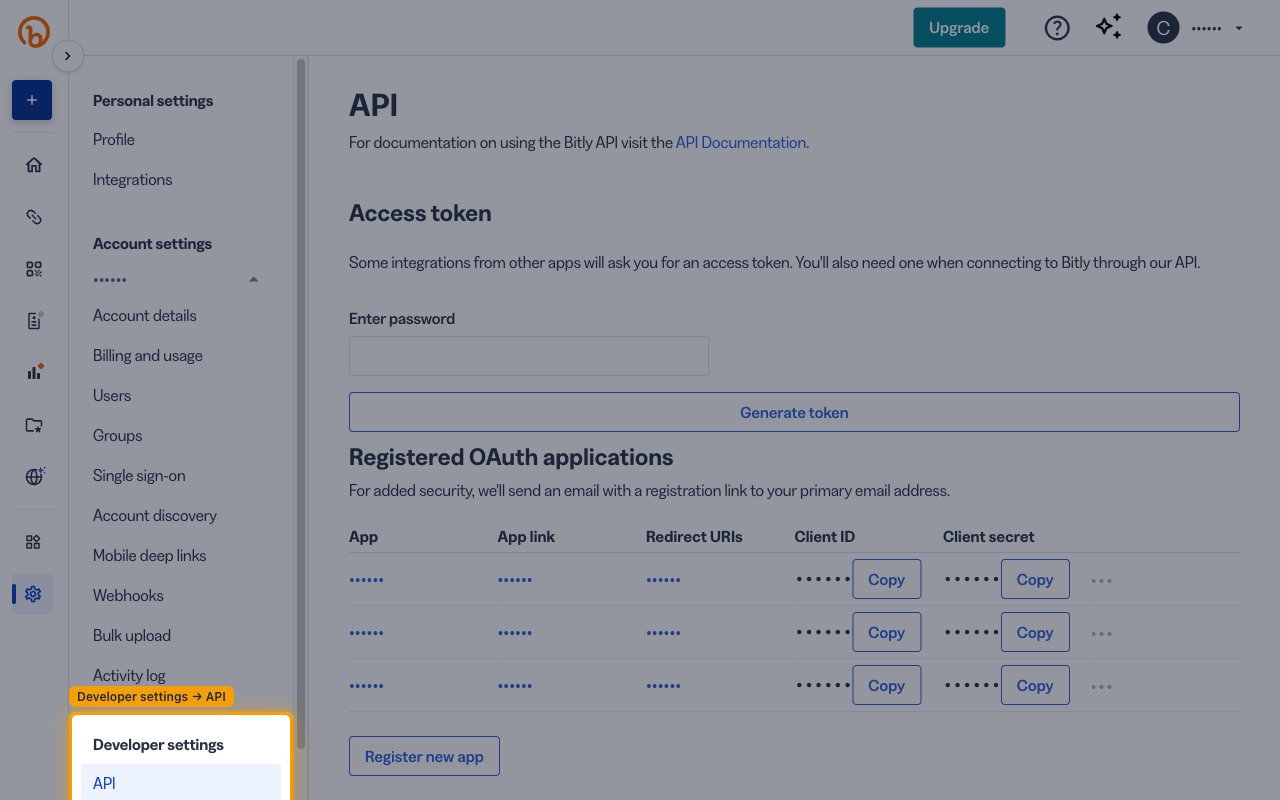
        <p>Sign in to your <a href="https://bitly.com" target="_blank" rel="noopener noreferrer">Bitly account</a> and open the OAuth applications settings.</p>

        <ul>
          <li>In the left sidebar, click <strong>Settings</strong>.</li>
          <li>Under the <strong>Developer settings</strong> section, click <strong>API</strong>.</li>
          <li>Scroll down to the <strong>Registered OAuth applications</strong> section.</li>
        </ul>

        <img src="https://mintcdn.com/stackone-60/9rb-C4C9-iUVEA-C/connectors/bitly/images/oauth-setup-developer-settings.png?fit=max&auto=format&n=9rb-C4C9-iUVEA-C&q=85&s=bba9aad06f0f7799fa2da76a67624387" alt="Bitly settings sidebar with the Developer settings section and its API item highlighted, opening the API page where the Registered OAuth applications section is found." width="1280" height="800" data-path="connectors/bitly/images/oauth-setup-developer-settings.png" />
      </div>
    </Step>

    <Step title="Register a new application">
      <div data-guide-step data-guide-scopes="" data-guide-display-scopes-list="">
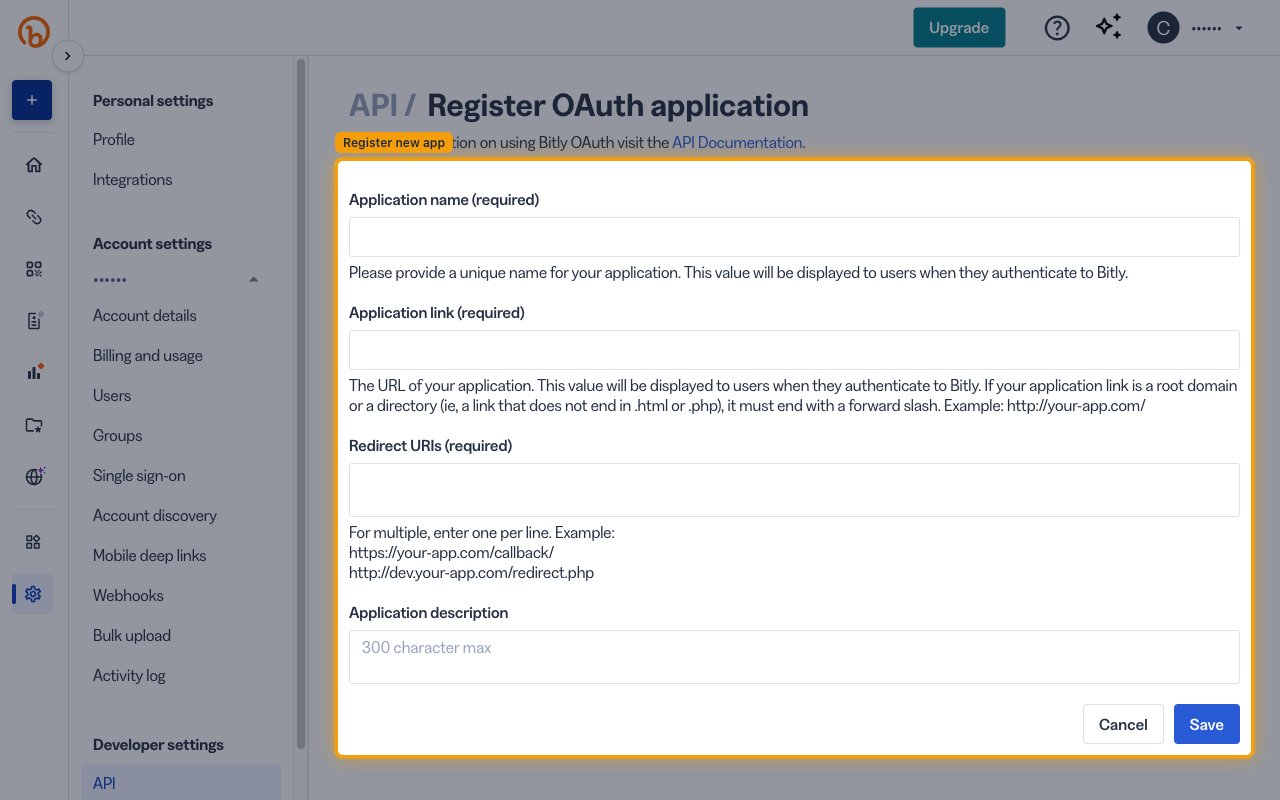
        <p>Click <strong>Register new app</strong> and fill in the application details.</p>

        <ul>
          <li><strong>Application Name:</strong> Enter a name (e.g., StackOne)</li>
          <li><strong>Application Link:</strong> Enter your company's website URL (e.g., `https://yourcompany.com`)</li>
          <li><strong>Redirect URI:</strong> `https://api.stackone.com/connect/oauth2/bitly/callback`</li>
          <li><strong>Application Description:</strong> Brief description of the integration</li>
          <li>Click <strong>Save</strong> to submit.</li>
        </ul>

        <img src="https://mintcdn.com/stackone-60/9rb-C4C9-iUVEA-C/connectors/bitly/images/oauth-setup-register-app.png?fit=max&auto=format&n=9rb-C4C9-iUVEA-C&q=85&s=8314804af8761c23c1052a1d3046b4da" alt="Bitly Register OAuth application form with the Application name, Application link, Redirect URIs and Application description fields." width="1280" height="800" data-path="connectors/bitly/images/oauth-setup-register-app.png" />
      </div>
    </Step>

    <Step title="Retrieve Client ID and Client secret">
      <div data-guide-step data-guide-scopes="" data-guide-display-scopes-list="">
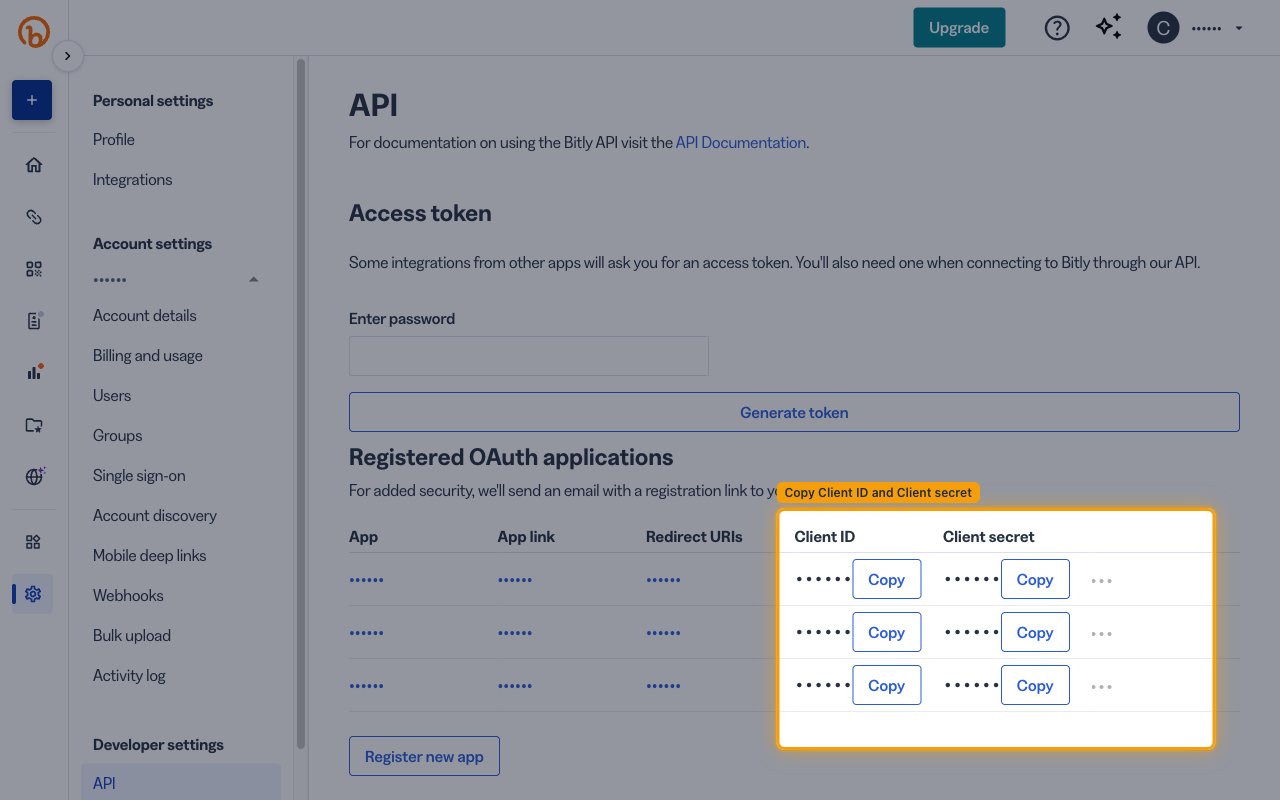
        <p>After you click <strong>Save</strong>, Bitly shows a <strong>Successfully registered OAuth app</strong> message and automatically returns you to the <strong>Registered OAuth applications</strong> list — no manual navigation is needed.</p>

        <ul>
          <li>Locate your newly registered application in the list.</li>
          <li>Copy the <strong>Client ID</strong> value.</li>
          <li>Copy the <strong>Client secret</strong> value.</li>
          <li>Store both values securely for use later.</li>
        </ul>

        <img src="https://mintcdn.com/stackone-60/9rb-C4C9-iUVEA-C/connectors/bitly/images/oauth-setup-oauth-applications.png?fit=max&auto=format&n=9rb-C4C9-iUVEA-C&q=85&s=dbd9ae2c5725728839a544786f85fd54" alt="Registered OAuth applications table with the Client ID and Client secret columns highlighted, each with a Copy button (values redacted)." width="1280" height="800" data-path="connectors/bitly/images/oauth-setup-oauth-applications.png" />
      </div>
    </Step>
  </Steps>
</section>

## Creating the StackOne Connector Profile

To create the Connector Profile in StackOne for <strong>Bitly</strong>:

<Steps>
  <Step title="Navigate to Connector Profiles">
    Login to StackOne and navigate to [Connector Profiles](https://app.stackone.com/connector_profiles)
  </Step>

  <Step title="Create New Connector Profile">
    <ul>
      <li>Click <strong>+ Connector Profile</strong></li>
      <li>Search for and select <strong>Bitly</strong></li>
      <li>Select <strong>Type</strong> as <strong>OAuth 2.0</strong></li>

      <li>
        Fill out the fields using details retrieved from your provider:

        <ul style={{ marginLeft: '20px' }}>
          <li><strong>Client ID</strong></li>
          <li><strong>Client Secret</strong></li>
        </ul>
      </li>

      <li>(Optional) Select <strong>Actions</strong> to be enabled for this Connector Profile</li>
      <li>Click <strong>Create profile</strong></li>
    </ul>
  </Step>
</Steps>

Congratulations! The new Connector Profile will now show up in your project ready to be used. You can now continue to <a href="/connect/managing-connectors/linking-accounts">Link Accounts</a> for <strong>Bitly</strong>.