> ## Documentation Index
> Fetch the complete documentation index at: https://docs.stackone.com/llms.txt
> Use this file to discover all available pages before exploring further.

# Connect Exa with API Key – StackOne Hub

> Link a Exa account in the StackOne Hub using API Key. End-user guide to authorize the integration and start using Exa actions.

<Warning>Your API key grants full access to your Exa account and usage credits. Keep it secure, never share it publicly, and rotate it immediately if it is exposed.</Warning>

<section data-guide-section data-guide-scopes="">
  <h2>Generating an Exa API key</h2>

  <p>To connect Exa with StackOne, generate an API key from the Exa Dashboard. Any Exa account works — sign-up is free, and a Personal team is enough to create a key.</p>

  <Steps>
    <Step title="Sign in to Exa">
      <div data-guide-step data-guide-scopes="" data-guide-display-scopes-list="">
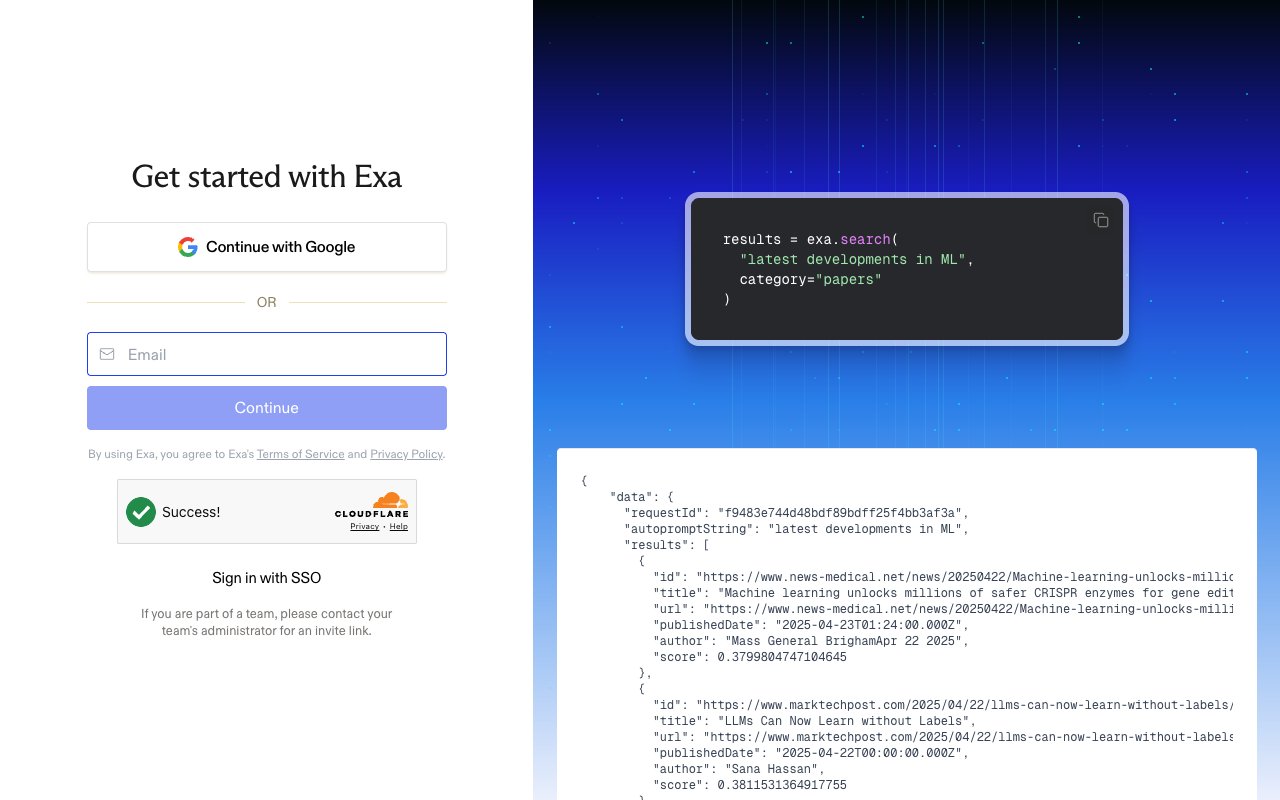
        <p>Sign in at the <a href="https://dashboard.exa.ai" target="_blank" rel="noopener noreferrer">Exa Dashboard</a>. On the <strong>Get started with Exa</strong> screen you can choose <strong>Continue with Google</strong>, enter your <strong>Email</strong> and click <strong>Continue</strong>, or use <strong>Sign in with SSO</strong>. If you don't have an account yet, create one for free.</p>

        <img src="https://mintcdn.com/stackone-60/EgoFVORC9_OCwt8Z/connectors/exa/images/custom-config-sign-in.png?fit=max&auto=format&n=EgoFVORC9_OCwt8Z&q=85&s=82b99718195d7dc3e42c9e1a760f85d4" alt="Exa &#x22;Get started with Exa&#x22; sign-in screen with Continue with Google, Email, and Sign in with SSO options." width="1280" height="800" data-path="connectors/exa/images/custom-config-sign-in.png" />
      </div>
    </Step>

    <Step title="Open the API Keys page">
      <div data-guide-step data-guide-scopes="" data-guide-display-scopes-list="">
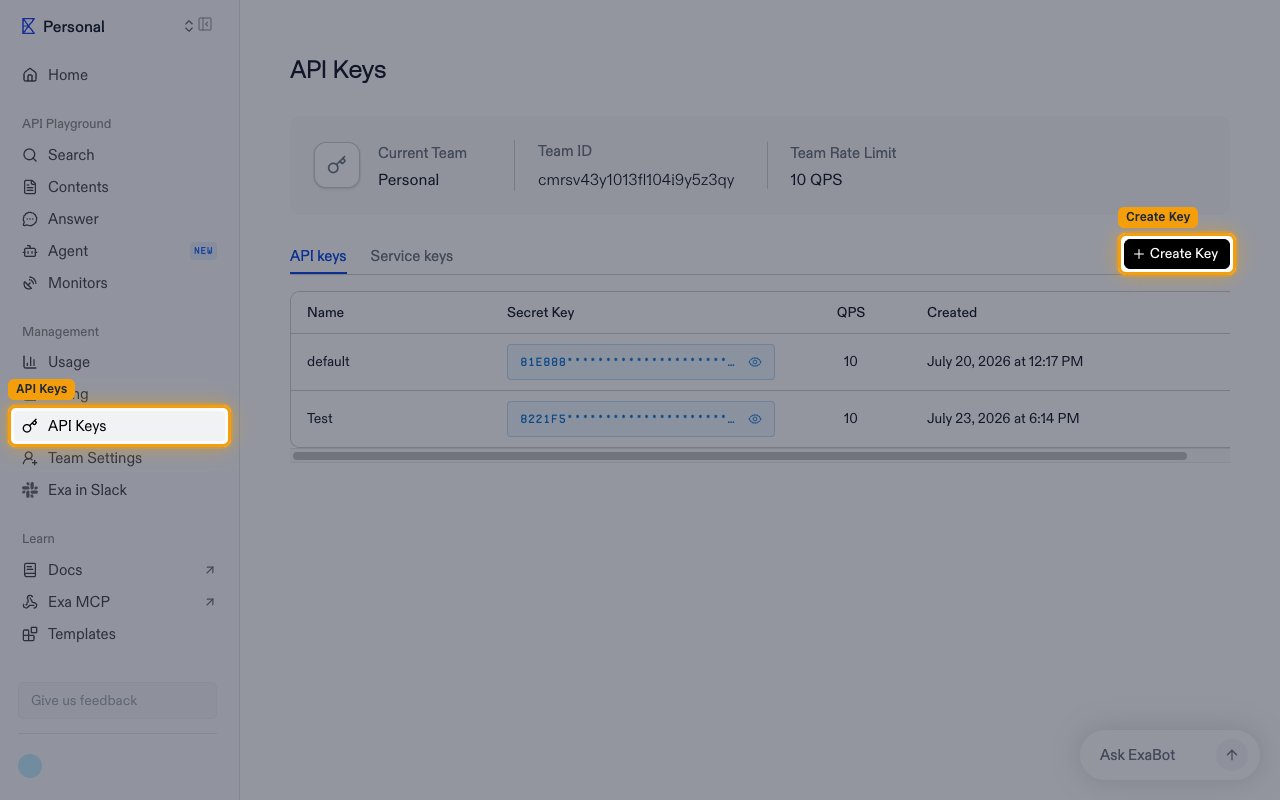
        <p>Open the <a href="https://dashboard.exa.ai/api-keys" target="_blank" rel="noopener noreferrer">API Keys</a> page from the dashboard.</p>

        <ul>
          <li>In the left sidebar, under <strong>Management</strong>, click <strong>API Keys</strong>.</li>
          <li>Make sure the <strong>API keys</strong> tab is selected (not <strong>Service keys</strong>).</li>
        </ul>

        <img src="https://mintcdn.com/stackone-60/EgoFVORC9_OCwt8Z/connectors/exa/images/custom-config-api-keys-page.png?fit=max&auto=format&n=EgoFVORC9_OCwt8Z&q=85&s=ada998fe9f2a96f460e561a46141e11c" alt="The API Keys page showing the API keys tab, the Create Key button, and the existing keys table." width="1280" height="800" data-path="connectors/exa/images/custom-config-api-keys-page.png" />
      </div>
    </Step>

    <Step title="Create an API key">
      <div data-guide-step data-guide-scopes="" data-guide-display-scopes-list="">
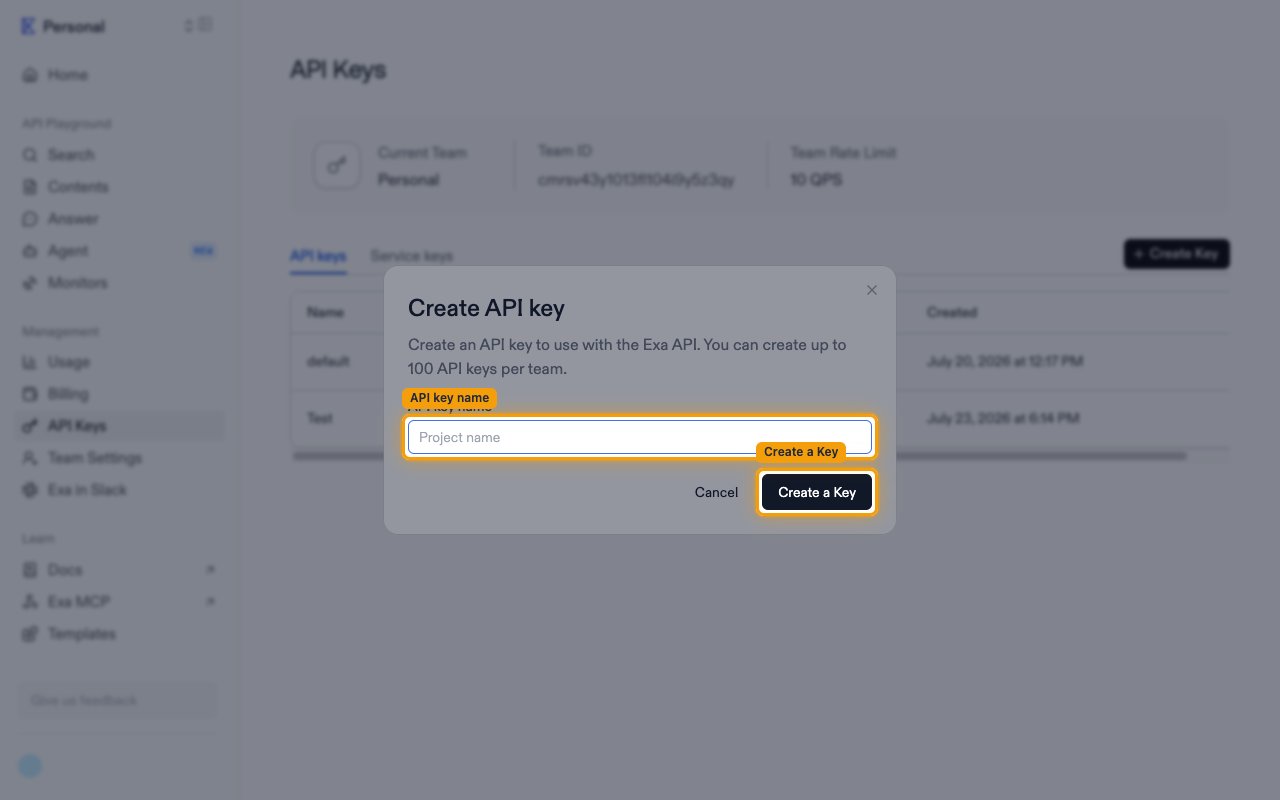
        <p>Click <strong>Create Key</strong> in the top-right corner. In the <strong>Create API key</strong> dialog, type a recognizable name in the <strong>API key name</strong> field, then click <strong>Create a Key</strong>.</p>

        <img src="https://mintcdn.com/stackone-60/EgoFVORC9_OCwt8Z/connectors/exa/images/custom-config-create-key-dialog.png?fit=max&auto=format&n=EgoFVORC9_OCwt8Z&q=85&s=1b5e2865ba8acb7204c63d95dbc42bd4" alt="The Create API key dialog with the API key name field and the Create a Key button." width="1280" height="800" data-path="connectors/exa/images/custom-config-create-key-dialog.png" />
      </div>
    </Step>

    <Step title="Copy the API key">
      <div data-guide-step data-guide-scopes="" data-guide-display-scopes-list="">
        <p>When the <strong>You have successfully created a new API key</strong> confirmation appears, copy the value from the <strong>API Key</strong> field using the copy button, then paste it into the <strong>API Key</strong> field in StackOne.</p>

        <ul>
          <li>The key is shown only once in this dialog and cannot be retrieved later — copy it before clicking <strong>Done</strong>.</li>
        </ul>
      </div>
    </Step>
  </Steps>
</section>

<div data-whitelabel-hide>
  <h2>Linking the Account from the Hub</h2>

  <Steps>
    <Step title="Navigate to the Hub">
      Use one of the three <a href="/guides/accounts-section#linking-accounts">Linking Account Methods</a> to access the Hub.
    </Step>

    <Step title="Fill out the fields">
      Fill out the following fields using details from your provider:

      <ul>
        <li><strong>API Key</strong></li>
      </ul>
    </Step>

    <Step title="Connect">
      <ul>
        <li>Click <strong>Connect</strong></li>
        <li>If applicable, the provider will redirect you to a sign-in or authorization page. Complete the provider's authorization flow.</li>
        <li>Once authorization is successful, you will see a confirmation popup</li>
      </ul>
    </Step>
  </Steps>

  <p>If the account linking is successful, you will see the newly linked account in your <a href="/guides/accounts-section">Accounts</a> page.</p>
</div>