> ## Documentation Index
> Fetch the complete documentation index at: https://docs.stackone.com/llms.txt
> Use this file to discover all available pages before exploring further.

# Connect Auvik with Basic Auth – StackOne Hub

> Link a Auvik account in the StackOne Hub using Basic Auth. End-user guide to authorize the integration and start using Auvik actions.

<Warning>The Auvik user whose API key you use must have the role permissions for the APIs you intend to call. Generating a key for a user without those permissions produces 403 responses.</Warning>

<section data-guide-section data-guide-scopes="">
  <h2>Find your Username and Region</h2>

  <p>Sign in to Auvik and collect the two values that identify your account.</p>

  <Steps>
    <Step title="Sign in to Auvik">
      <div data-guide-step data-guide-scopes="" data-guide-display-scopes-list="">
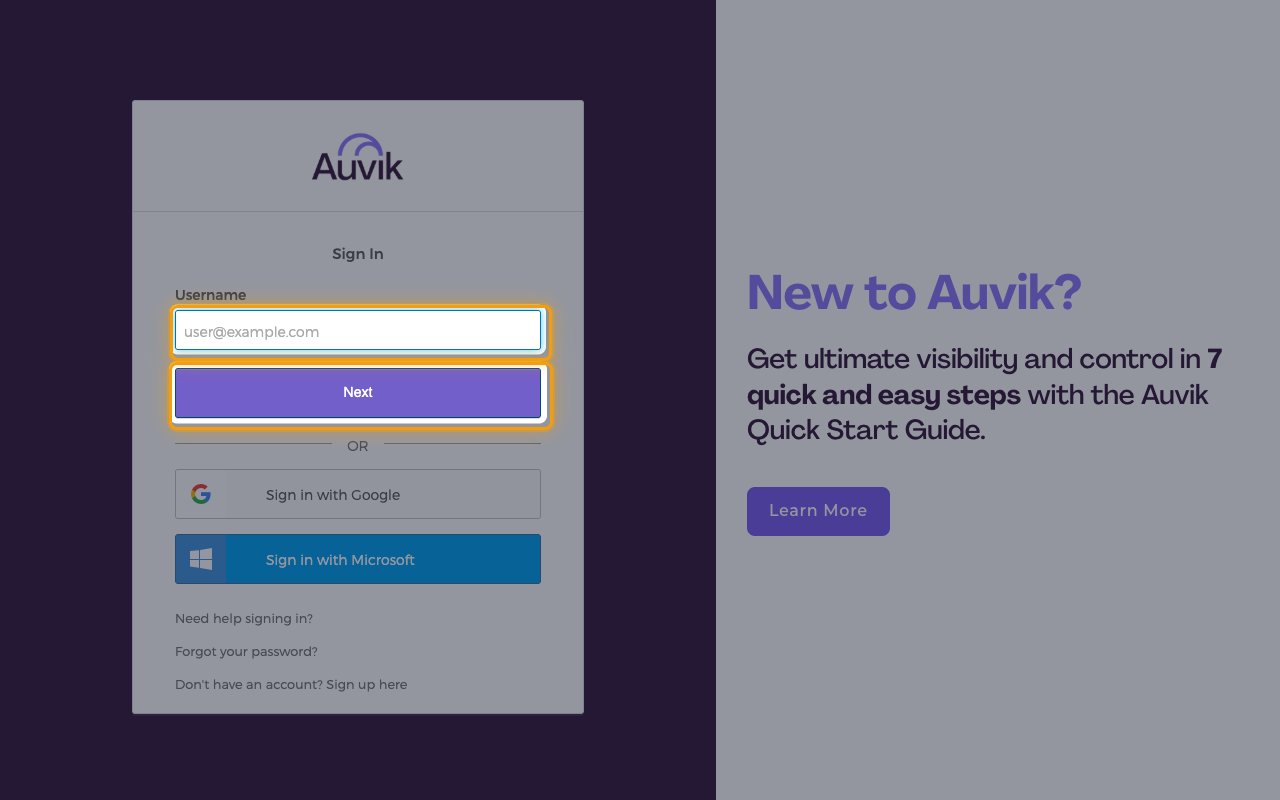
        <p>Open the <a href="https://auth.auvik.com" target="_blank" rel="noopener noreferrer">Auvik sign-in page</a> and sign in as the user you want StackOne to authenticate as. Sign-in is two steps: type the address in <strong>Username</strong>, click <strong>Next</strong>, then enter the password on the screen that follows.</p>

        <ul>
          <li><strong>Sign in with Google</strong> and <strong>Sign in with Microsoft</strong> are available if your Auvik account uses one of those identity providers.</li>
          <li>Use a dedicated Auvik user as a service account rather than an individual employee's login — if that person's account is deactivated, the API key stops working.</li>
        </ul>

        <img src="https://mintcdn.com/stackone-60/iucz7h0y8s0R_AjH/connectors/auvik/images/basic-config-sign-in.png?fit=max&auto=format&n=iucz7h0y8s0R_AjH&q=85&s=ca63f83ed67b43e606ec6d0a1d4192ed" alt="Auvik Sign In page with the Username field and the Next button highlighted" width="1280" height="800" data-path="connectors/auvik/images/basic-config-sign-in.png" />
      </div>
    </Step>

    <Step title="Find your Region / Cluster">
      <div data-guide-step data-guide-scopes="" data-guide-display-scopes-list="">
        <p>Your <strong>Region / Cluster</strong> is the middle segment of your Auvik dashboard address, between your site name and `my.auvik.com`. Read it from your browser's address bar once you are signed in.</p>

        <ul>
          <li>Format: `https://{domain-prefix}.{region}.my.auvik.com`</li>
          <li>Example: for `https://stackonedev.lnx.my.auvik.com`, the Region / Cluster is `lnx`</li>
          <li>Enter this value in the <strong>Region / Cluster</strong> field in StackOne Hub.</li>
          <li>If the region is wrong, or your account is later moved to another cluster, Auvik responds with an HTTP 308 redirect pointing at your account's actual cluster.</li>
        </ul>
      </div>
    </Step>

    <Step title="Copy your Username">
      <div data-guide-step data-guide-scopes="" data-guide-display-scopes-list="">
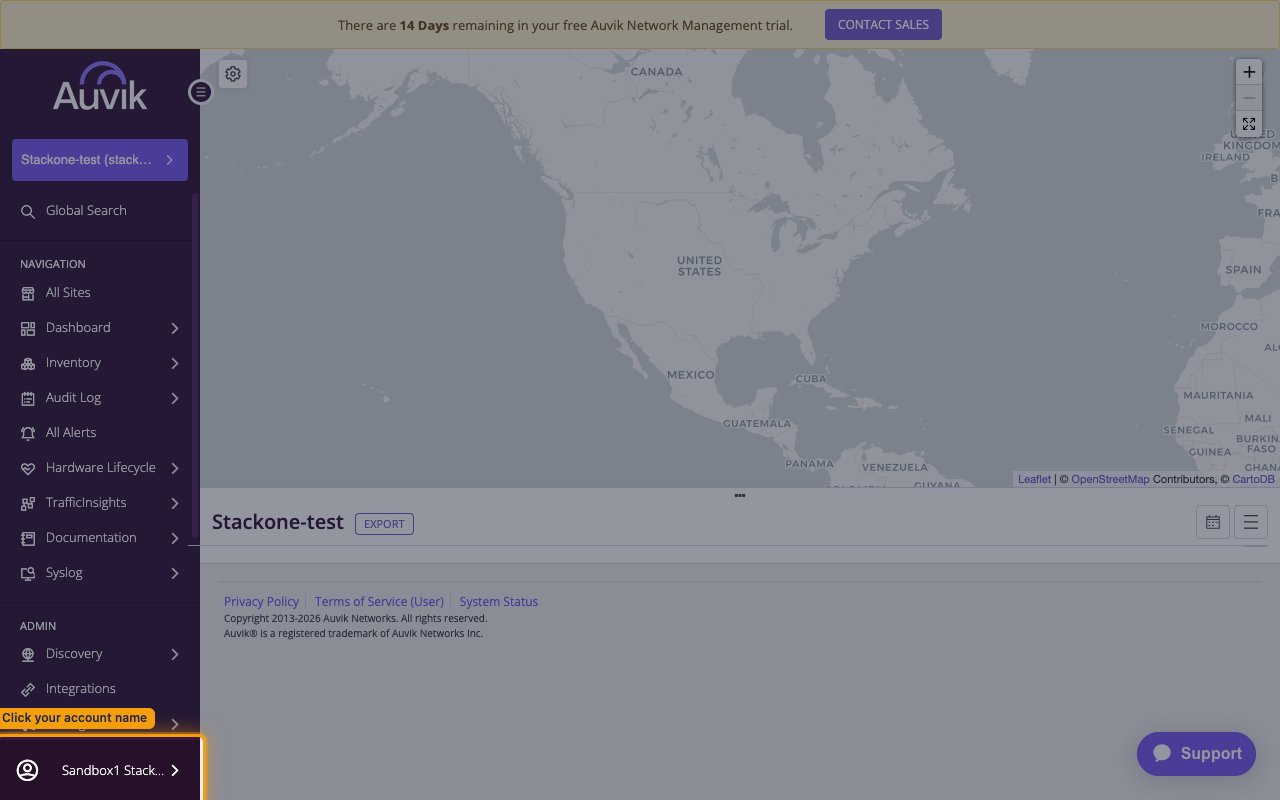
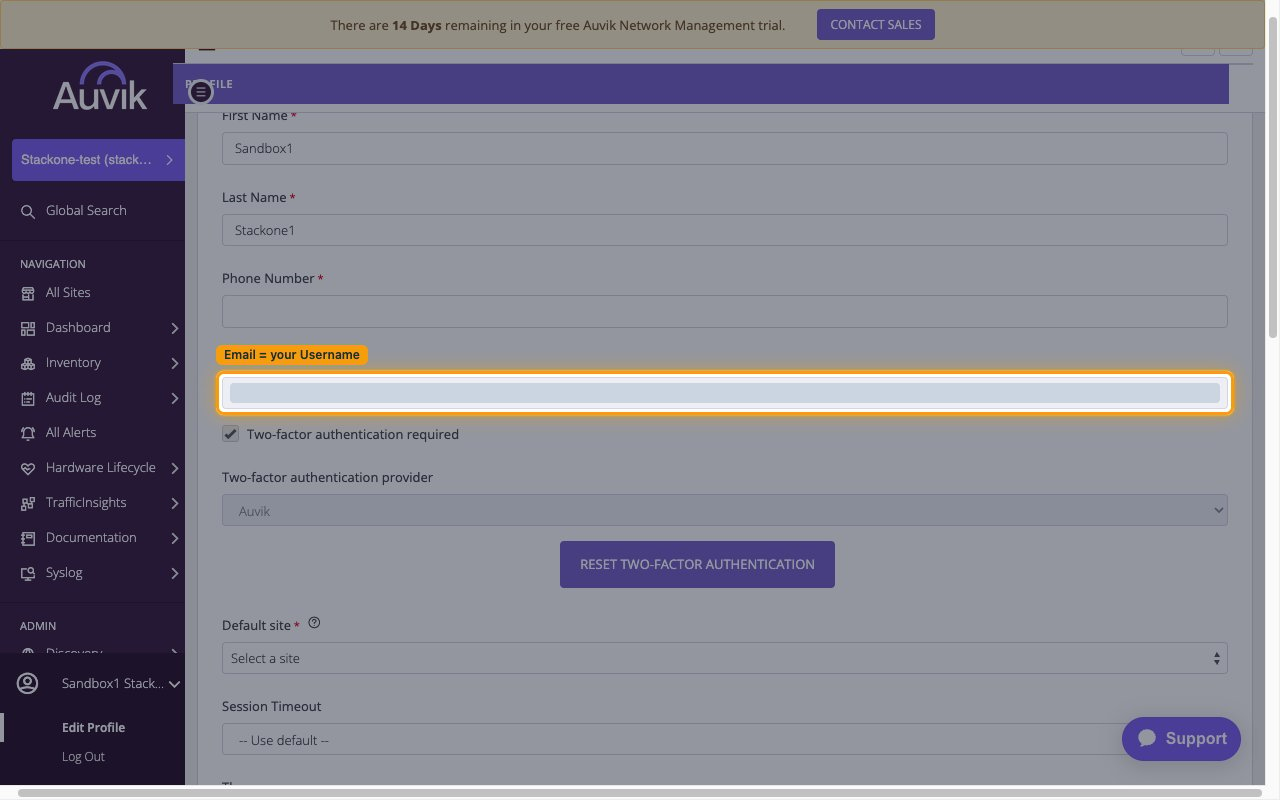
        <p>In the left navigation, click your account name at the bottom, then click <strong>Edit Profile</strong> to open the <strong>Profile</strong> page. The address in the <strong>Email</strong> field is your <strong>Username</strong>.</p>

        <ul>
          <li>Copy the <strong>Email</strong> value and paste it into the <strong>Username</strong> field in StackOne Hub.</li>
        </ul>

        <img src="https://mintcdn.com/stackone-60/iucz7h0y8s0R_AjH/connectors/auvik/images/basic-config-open-profile.png?fit=max&auto=format&n=iucz7h0y8s0R_AjH&q=85&s=d98c20cce88aebf0aeaf56aa9c8c63a3" alt="Auvik dashboard with the account name at the bottom of the left navigation highlighted" width="1280" height="800" data-path="connectors/auvik/images/basic-config-open-profile.png" />
      </div>
    </Step>

    <Step title="Locate the Email field">
      <div data-guide-step data-guide-scopes="" data-guide-display-scopes-list="">
        <p>On the <strong>Profile</strong> page, the <strong>Email</strong> field near the top holds the sign-in address you need.</p>

        <img src="https://mintcdn.com/stackone-60/iucz7h0y8s0R_AjH/connectors/auvik/images/basic-config-username.png?fit=max&auto=format&n=iucz7h0y8s0R_AjH&q=85&s=564d13623f0df4daf312a08f49c24354" alt="Auvik Profile page with the Email field highlighted" width="1280" height="800" data-path="connectors/auvik/images/basic-config-username.png" />
      </div>
    </Step>
  </Steps>
</section>

<section data-guide-section data-guide-scopes="">
  <h2>Generate your API Key</h2>

  <p>Generate an <strong>API Key</strong> on the same <strong>Profile</strong> page. This is the value StackOne uses as the password.</p>

  <Steps>
    <Step title="Open the API Key section">
      <div data-guide-step data-guide-scopes="" data-guide-display-scopes-list="">
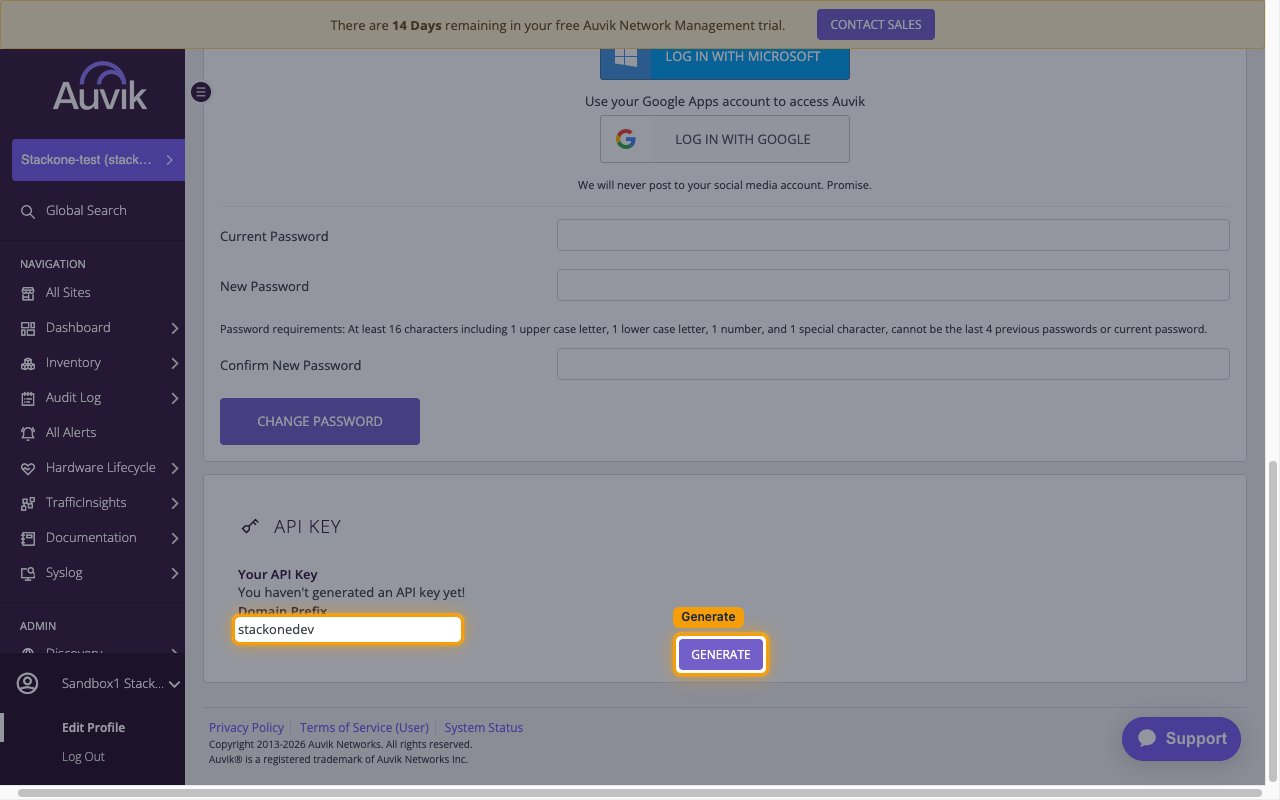
        <p>Scroll to the bottom of the <strong>Profile</strong> page to the <strong>API Key</strong> section. If you have never created one, <strong>Your API Key</strong> reads `You haven't generated an API key yet!` and a <strong>Generate</strong> button is shown. If a key already exists, the buttons read <strong>Regenerate</strong> and <strong>Revoke</strong> instead.</p>

        <ul>
          <li>The <strong>Domain Prefix</strong> shown here (for example `stackonedev`) is your site name — it is not the <strong>Region / Cluster</strong>.</li>
          <li><strong>Regenerate</strong> immediately invalidates the previous key, so only use it if you are ready to update everywhere the old key is in use.</li>
        </ul>

        <img src="https://mintcdn.com/stackone-60/iucz7h0y8s0R_AjH/connectors/auvik/images/basic-config-api-key-section.png?fit=max&auto=format&n=iucz7h0y8s0R_AjH&q=85&s=a61984ae2d744a554a334afb765edc8d" alt="API Key section of the Auvik Profile page with the Domain Prefix value and the Generate button highlighted" width="1280" height="800" data-path="connectors/auvik/images/basic-config-api-key-section.png" />
      </div>
    </Step>

    <Step title="Copy the key and finish">
      <div data-guide-step data-guide-scopes="" data-guide-display-scopes-list="">
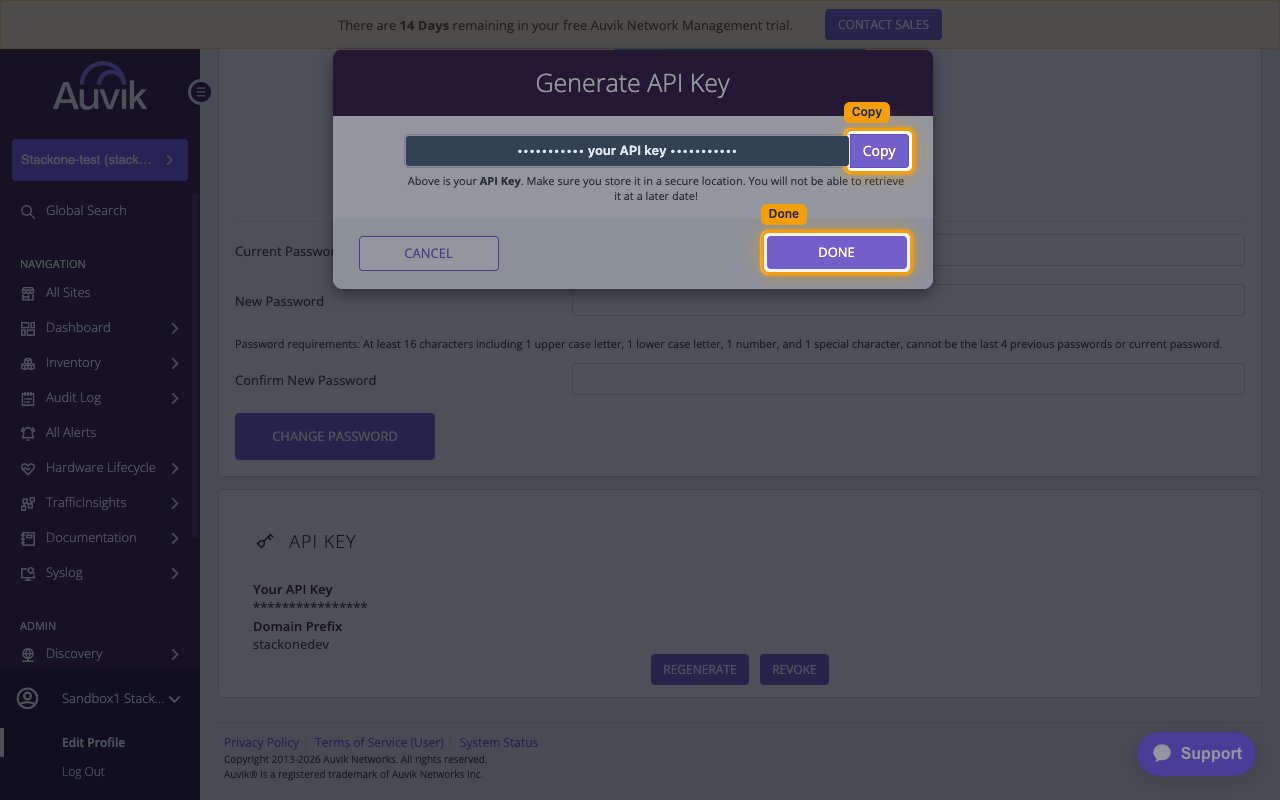
        <p>Click <strong>Generate</strong>. In the <strong>Generate API Key</strong> dialog, click <strong>Copy</strong> to copy the key, then click <strong>Done</strong>.</p>

        <ul>
          <li>The <strong>API Key</strong> is only displayed once, at generation time, and cannot be retrieved later. Auvik states: Above is your <strong>API Key</strong>. Make sure you store it in a secure location. You will not be able to retrieve it at a later date!</li>
          <li>Paste the copied key into the <strong>API Key</strong> field in StackOne Hub before closing the dialog — once you click <strong>Done</strong> the full value is replaced by asterisks and cannot be read again.</li>
          <li>Clicking <strong>Cancel</strong> discards the dialog, but the key has already been created at this point.</li>
        </ul>

        <img src="https://mintcdn.com/stackone-60/iucz7h0y8s0R_AjH/connectors/auvik/images/basic-config-copy-api-key.png?fit=max&auto=format&n=iucz7h0y8s0R_AjH&q=85&s=25466c15abf3d032066569b80b3053d2" alt="Generate API Key dialog with the masked key value, the Copy button, and the Done button highlighted" width="1280" height="800" data-path="connectors/auvik/images/basic-config-copy-api-key.png" />
      </div>
    </Step>
  </Steps>
</section>

<div data-whitelabel-hide>
  <h2>Linking the Account from the Hub</h2>

  <Steps>
    <Step title="Navigate to the Hub">
      Use one of the three <a href="/connect/managing-connectors/linking-accounts">Linking Account Methods</a> to access the Hub.
    </Step>

    <Step title="Fill out the fields">
      Fill out the following fields using details from your provider:

      <ul>
        <li><strong>Region / Cluster</strong></li>
        <li><strong>Username</strong></li>
        <li><strong>API Key</strong></li>
      </ul>
    </Step>

    <Step title="Connect">
      <ul>
        <li>Click <strong>Connect</strong></li>
        <li>If applicable, the provider will redirect you to a sign-in or authorization page. Complete the provider's authorization flow.</li>
        <li>Once authorization is successful, you will see a confirmation popup</li>
      </ul>
    </Step>
  </Steps>

  <p>If the account linking is successful, you will see the newly linked account in your <a href="/gateway/concepts/linked-accounts">Accounts</a> page.</p>
</div>

## Next Steps

<Columns cols={2}>
  <Card title="Webhooks setup" href="/connectors/auvik/guides/webhook-setup">
    <p className="connector-page-auth-description" style={{ fontSize: '14px', marginTop: 0, marginBottom: 0 }}>
      Configure receiving Events for Auvik into StackOne.
    </p>
  </Card>
</Columns>