> ## Documentation Index
> Fetch the complete documentation index at: https://docs.stackone.com/llms.txt
> Use this file to discover all available pages before exploring further.

# Connect Re:amaze with API Key – StackOne Hub

> Link a Re:amaze account in the StackOne Hub using API Key. End-user guide to authorize the integration and start using Re:amaze actions.

<Warning>Admin access to your Re:amaze account is required to generate an API token.</Warning>

<section data-guide-section data-guide-scopes="">
  <h2>Create your Re:amaze account</h2>

  <p>If you do not have a Re:amaze account, sign up at <a href="https://www.reamaze.com/new_user" target="_blank" rel="noopener noreferrer">Re:amaze</a>.</p>

  <Steps>
    <Step title="Verify your email address">
      <div data-guide-step data-guide-scopes="" data-guide-display-scopes-list="">
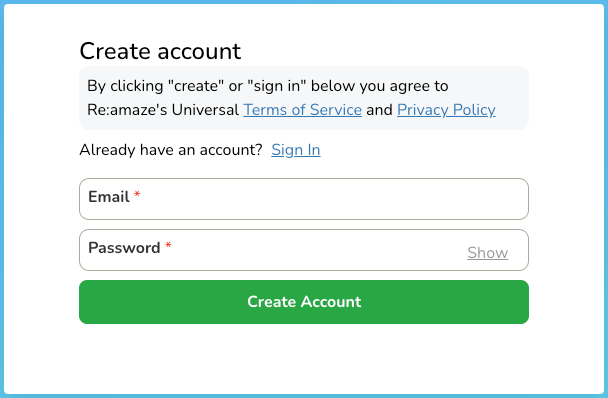
        <p>Visit <a href="https://www.reamaze.com/new_user" target="_blank" rel="noopener noreferrer">Re:amaze Sign Up</a> and complete the verification process.</p>

        <ul>
          <li>Provide your email address and password.</li>
          <li>Verify your email address using the confirmation email sent to you with a verification code.</li>
        </ul>

        <img src="https://mintcdn.com/stackone-60/WLO1dS7UyEO1KFXa/connectors/reamaze/images/step-0-create-account.png?fit=max&auto=format&n=WLO1dS7UyEO1KFXa&q=85&s=11e49f0b973ddc98f29ed7636189d219" alt="Create Account Page" width="608" height="398" data-path="connectors/reamaze/images/step-0-create-account.png" />
      </div>
    </Step>

    <Step title="Complete registration">
      <div data-guide-step data-guide-scopes="" data-guide-display-scopes-list="">
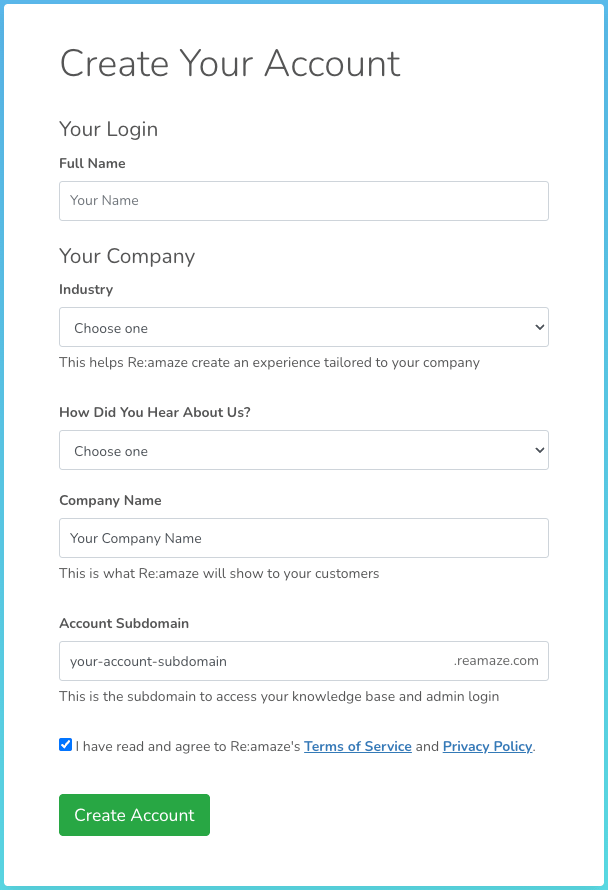
        <p>After verifying your email address, enter your company information and create your Re:amaze account.</p>

        <ul>
          <li><strong>Full Name</strong>: Enter your full name as you would like it to appear in your Re:amaze account.</li>
          <li>Select your `Industry`, `Hear About Us?`, and `Company Name`.</li>
          <li><strong>Account Subdomain or Brand domain</strong>: Enter a unique subdomain for your Re:amaze account. This will form part of your account URL (e.g., `https://{yourcompany}.reamaze.io`).</li>
          <li>Agree to the Re:amaze Terms by ticking the checkbox.</li>
          <li>Click <strong>Create Account</strong> to complete the sign-up process.</li>
          <li>Copy and save your <strong>Account Subdomain or Brand domain</strong> for future reference.</li>
        </ul>

        <img src="https://mintcdn.com/stackone-60/WLO1dS7UyEO1KFXa/connectors/reamaze/images/step-0_3-signup.png?fit=max&auto=format&n=WLO1dS7UyEO1KFXa&q=85&s=2a0365554780f99bf1c6a62b5270d338" alt="Sign Up Page" width="608" height="890" data-path="connectors/reamaze/images/step-0_3-signup.png" />
      </div>
    </Step>

    <Step title="Identify your brand domain">
      <div data-guide-step data-guide-scopes="" data-guide-display-scopes-list="">
        <p>Your brand domain was set during registration. It is the first part of your Re:amaze account URL.</p>

        <ul>
          <li>Format: `https://{brand}.reamaze.io`</li>
          <li>Example: If your URL is `https://yourcompany.reamaze.io`, your brand domain is `yourcompany`</li>
        </ul>
      </div>
    </Step>
  </Steps>
</section>

<section data-guide-section data-guide-scopes="">
  <h2>Access your Re:amaze account</h2>

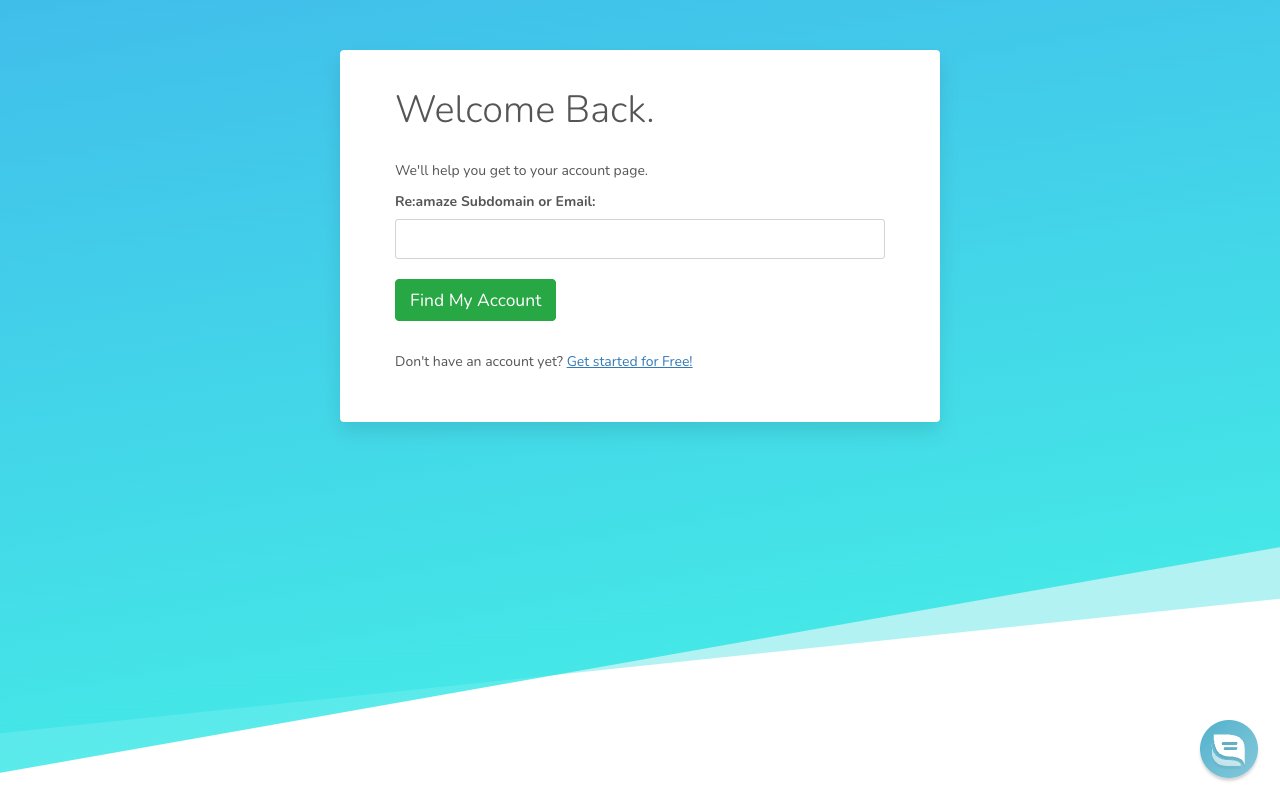
  <p>Navigate to the <a href="https://www.reamaze.com/login" target="_blank" rel="noopener noreferrer">Login</a> page, or go directly to `https://{brand}.reamaze.io/login` if you already know your brand domain.</p>

  <ul>
    <li><strong>Re:amaze Subdomain or Email</strong>: Enter your brand domain (e.g., `yourcompany`) or the email address associated with your Re:amaze account.</li>
    <li>You will be redirected to your account login page, or to a <strong>Select an account</strong> page where you need to select your company.</li>
  </ul>

  <img src="https://mintcdn.com/stackone-60/KJWa78J6ij6BBBPN/connectors/reamaze/images/step-1-sub-domain.png?fit=max&auto=format&n=KJWa78J6ij6BBBPN&q=85&s=8ea0fe35d054073c2366aa3cfcfa84c3" alt="Subdomain Page" width="1280" height="800" data-path="connectors/reamaze/images/step-1-sub-domain.png" />
</section>

<section data-guide-section data-guide-scopes="">
  <h2>Sign in to your Re:amaze account</h2>

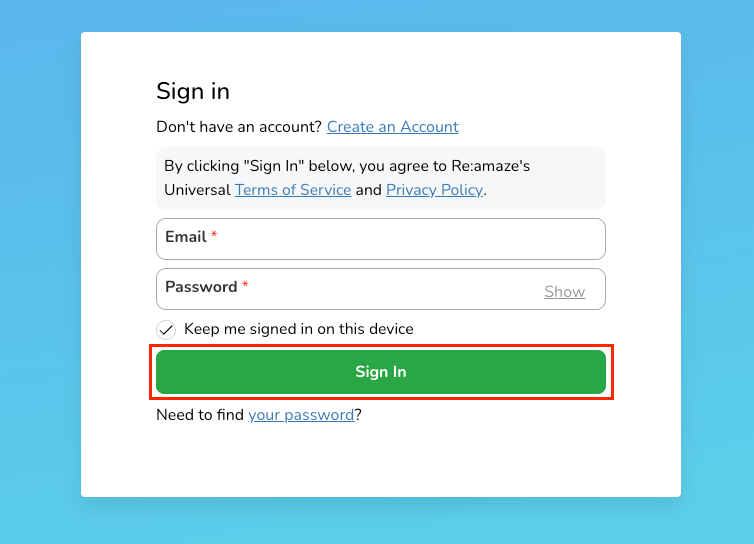
  <p>Enter your credentials at `https://{brand}.reamaze.io/login`, replacing `{brand}` with your brand domain.</p>

  <ul>
    <li><strong>Email</strong>: Enter the email address you used to register your Re:amaze account.</li>
    <li><strong>Password</strong>: Enter your account password.</li>
    <li>Click <strong>Sign In</strong> to access your Re:amaze account.</li>
  </ul>

  <img src="https://mintcdn.com/stackone-60/KJWa78J6ij6BBBPN/connectors/reamaze/images/step-2-sign-in.png?fit=max&auto=format&n=KJWa78J6ij6BBBPN&q=85&s=1b2427b0fbfa24e59eb7885c77298aa2" alt="Sign In Page" width="754" height="544" data-path="connectors/reamaze/images/step-2-sign-in.png" />
</section>

<section data-guide-section data-guide-scopes="">
  <h2>Find your login email</h2>

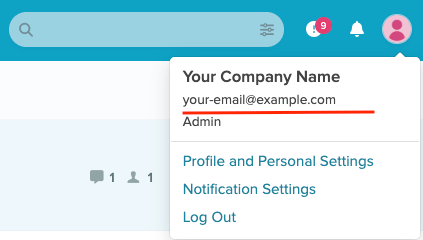
  <p>The login email is the email address associated with your Re:amaze account. It is used as the API authentication username.</p>

  <Steps>
    <Step title="Locate your login email">
      <div data-guide-step data-guide-scopes="" data-guide-display-scopes-list="">
        <p>This is typically the email address you used during registration.</p>

        <ul>
          <li>You can confirm your email by clicking the avatar icon in the top-right corner.</li>
        </ul>

        <img src="https://mintcdn.com/stackone-60/WLO1dS7UyEO1KFXa/connectors/reamaze/images/step-2_1-login-email.png?fit=max&auto=format&n=WLO1dS7UyEO1KFXa&q=85&s=5598342e17e3405641e8cd07ff323c52" alt="Login Email Location" width="423" height="240" data-path="connectors/reamaze/images/step-2_1-login-email.png" />
      </div>
    </Step>
  </Steps>
</section>

<section data-guide-section data-guide-scopes="">
  <h2>Generate an API token</h2>

  <p>An API token is required to authenticate with the Re:amaze API.</p>

  <Steps>
    <Step title="Access API Token settings">
      <div data-guide-step data-guide-scopes="" data-guide-display-scopes-list="">
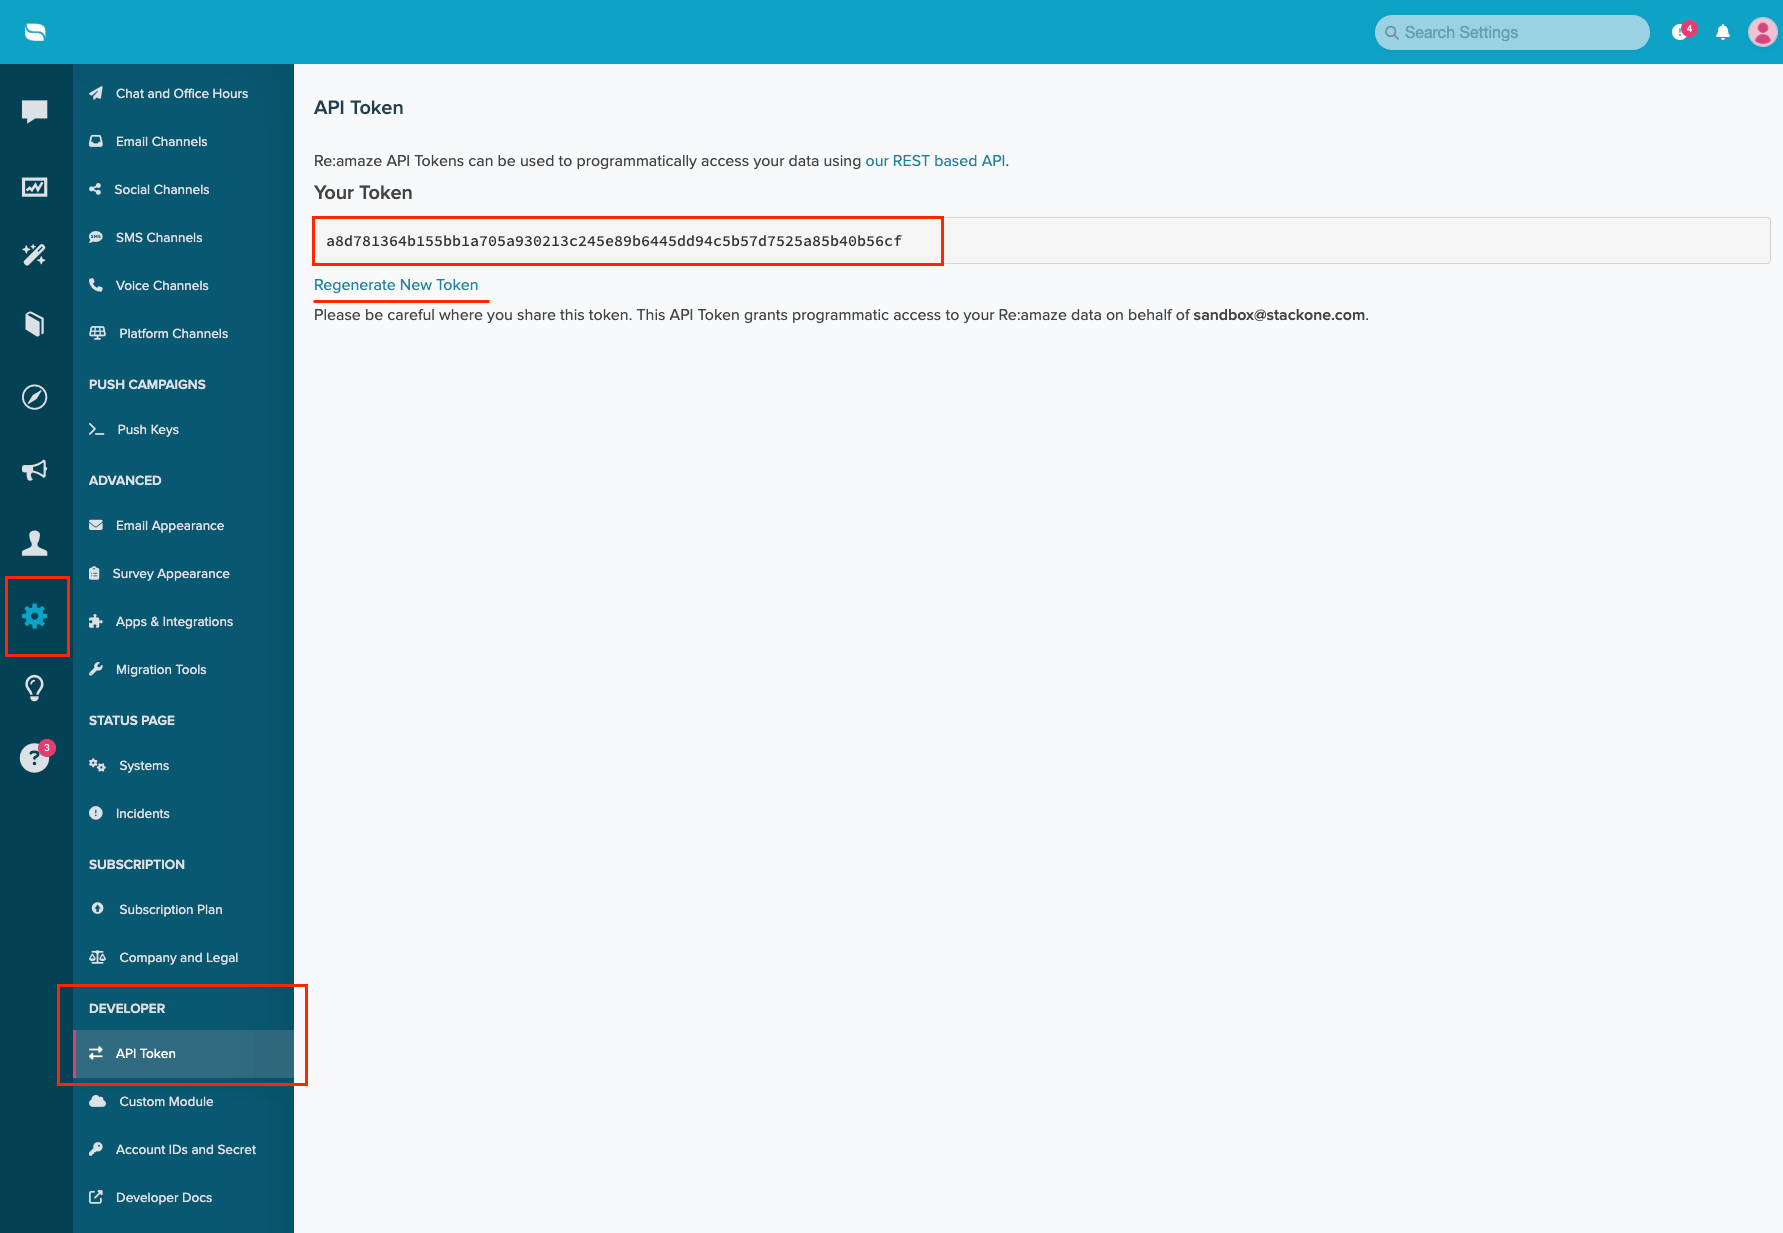
        <p>Navigate to <strong>Settings</strong> in the left sidebar.</p>

        <ul>
          <li>Scroll down to the <strong>Developer</strong> section.</li>
          <li>Click on <strong>API Token</strong>.</li>
        </ul>
      </div>
    </Step>

    <Step title="Generate or copy your token">
      <div data-guide-step data-guide-scopes="" data-guide-display-scopes-list="">
        <p>If you do not have a token yet, click <strong>Generate New Token</strong> to create one. Copy the token value and store it securely.</p>

        <ul>
          <li>If you already have a token, you can copy it from the <strong>Your Token</strong> field.</li>
          <li>Caution: The API token grants full access to your Re:amaze account. Store it securely and do not share it.</li>
        </ul>

        <img src="https://mintcdn.com/stackone-60/KJWa78J6ij6BBBPN/connectors/reamaze/images/step-3-generate-token.png?fit=max&auto=format&n=KJWa78J6ij6BBBPN&q=85&s=0540e35d6d6fec24332701f7aab13f77" alt="Generate API Token" width="1783" height="1233" data-path="connectors/reamaze/images/step-3-generate-token.png" />
      </div>
    </Step>
  </Steps>
</section>

<div data-whitelabel-hide>
  <h2>Linking the Account from the Hub</h2>

  <Steps>
    <Step title="Navigate to the Hub">
      Use one of the three <a href="/connect/managing-connectors/linking-accounts">Linking Account Methods</a> to access the Hub.
    </Step>

    <Step title="Fill out the fields">
      Fill out the following fields using details from your provider:

      <ul>
        <li><strong>Brand Domain</strong></li>
        <li><strong>Login Email</strong></li>
        <li><strong>API Token</strong></li>
      </ul>
    </Step>

    <Step title="Connect">
      <ul>
        <li>Click <strong>Connect</strong></li>
        <li>If applicable, the provider will redirect you to a sign-in or authorization page. Complete the provider's authorization flow.</li>
        <li>Once authorization is successful, you will see a confirmation popup</li>
      </ul>
    </Step>
  </Steps>

  <p>If the account linking is successful, you will see the newly linked account in your <a href="/gateway/concepts/linked-accounts">Accounts</a> page.</p>
</div>